7878-K853 Scale Upgrade
This kit contains the components to upgrade the NCR RealScan™ 78 Bi–Optic Scanner(7878) with a 16" Scale Assembly with Debris Guard.
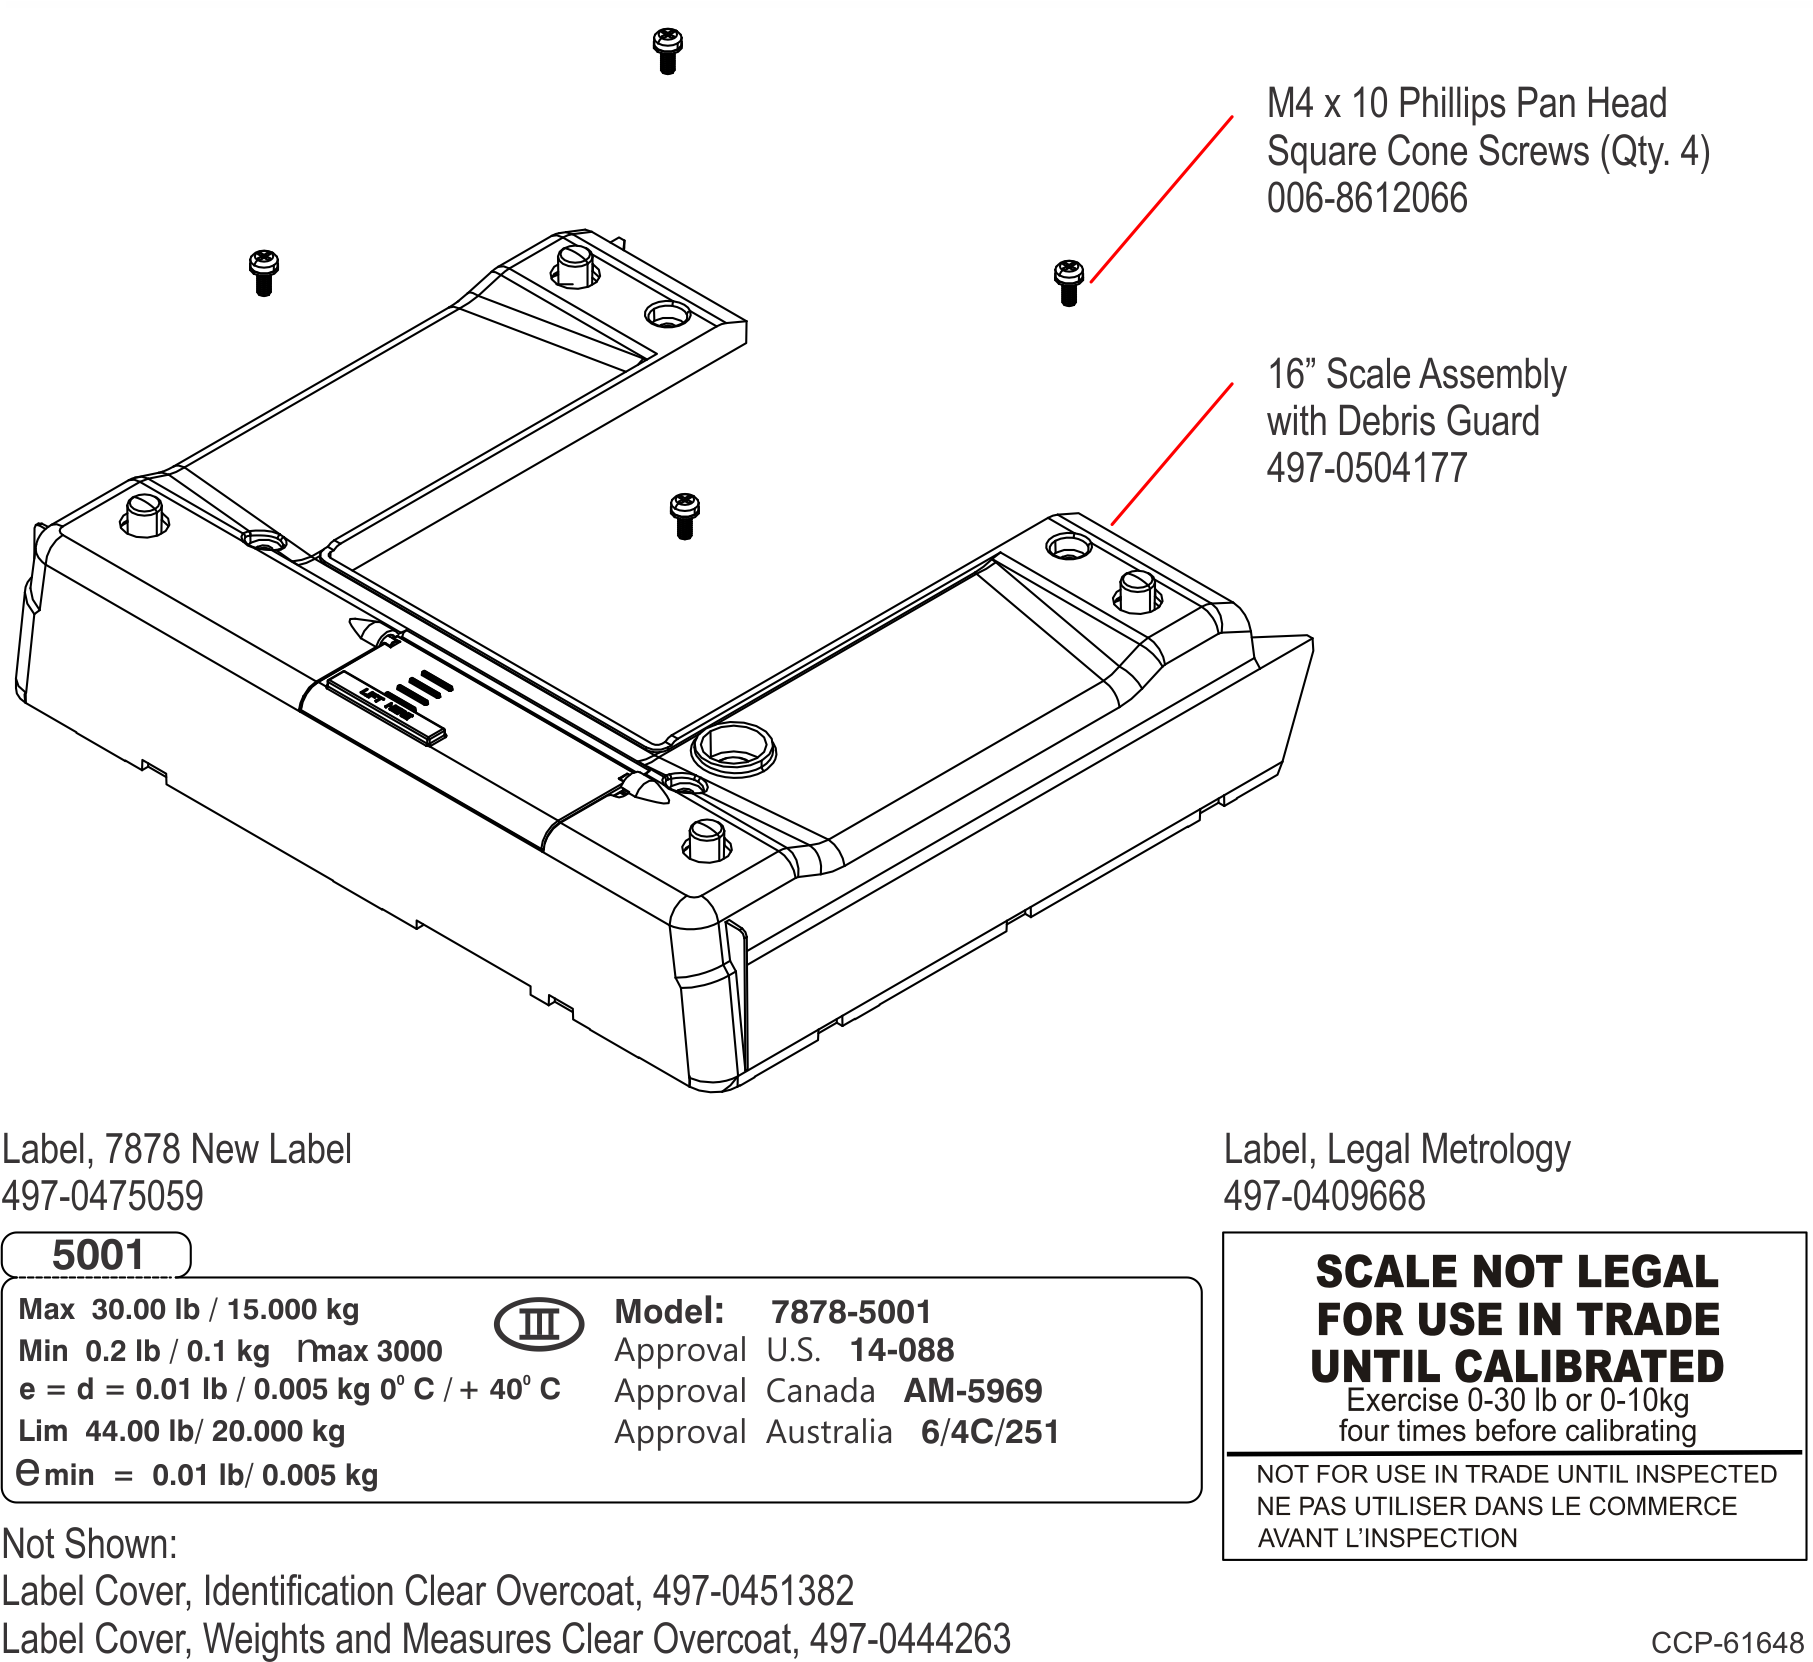
Kit Contents
Kit Installation
Warning: Disconnect the AC power cord before disassembling the Scanner.
These are the general steps to upgrade the NCR RealScan™ 78 Bi–Optic Scanner (7878) with a new Scale Assembly with Debris Guard:
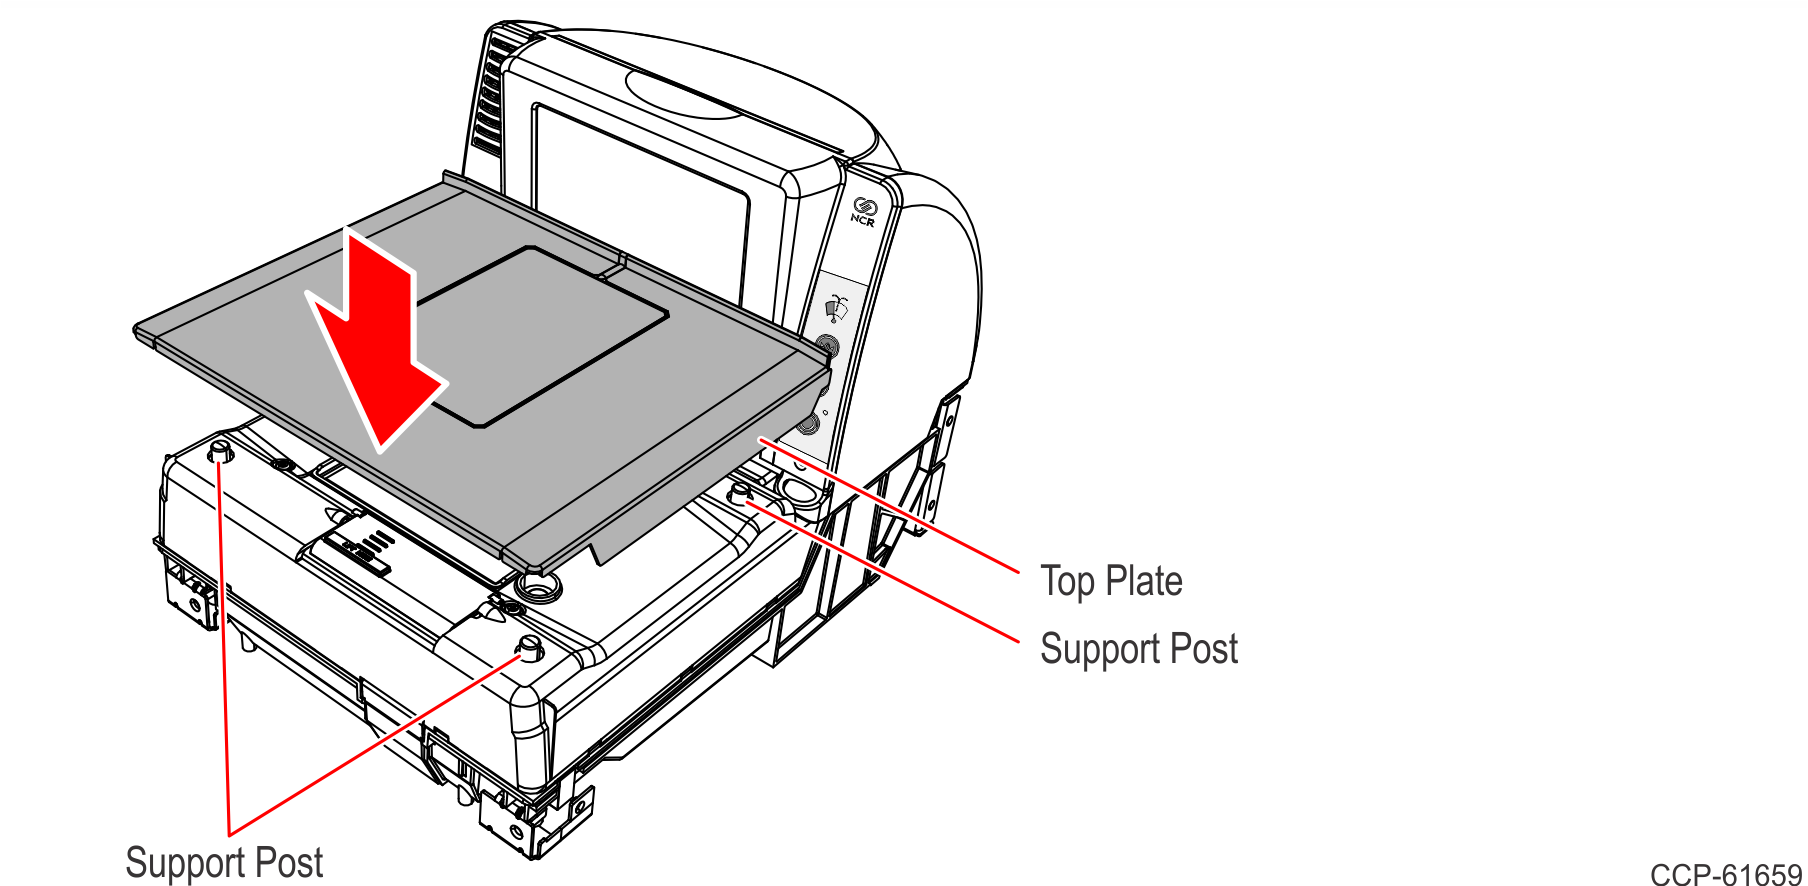
1.Remove the Top Plate.
2.Remove the Front Bezel.
3.Remove the existing Debris Guard.
4.Affix the labels on the new Scale Assembly with Debris Guard.
5.Install the new Scale Assembly with Debris Guard.
6.Reinstall the Front Bezel.
7.Reinstall the Top Plate.
For detailed instructions, refer to the succeeding sections.
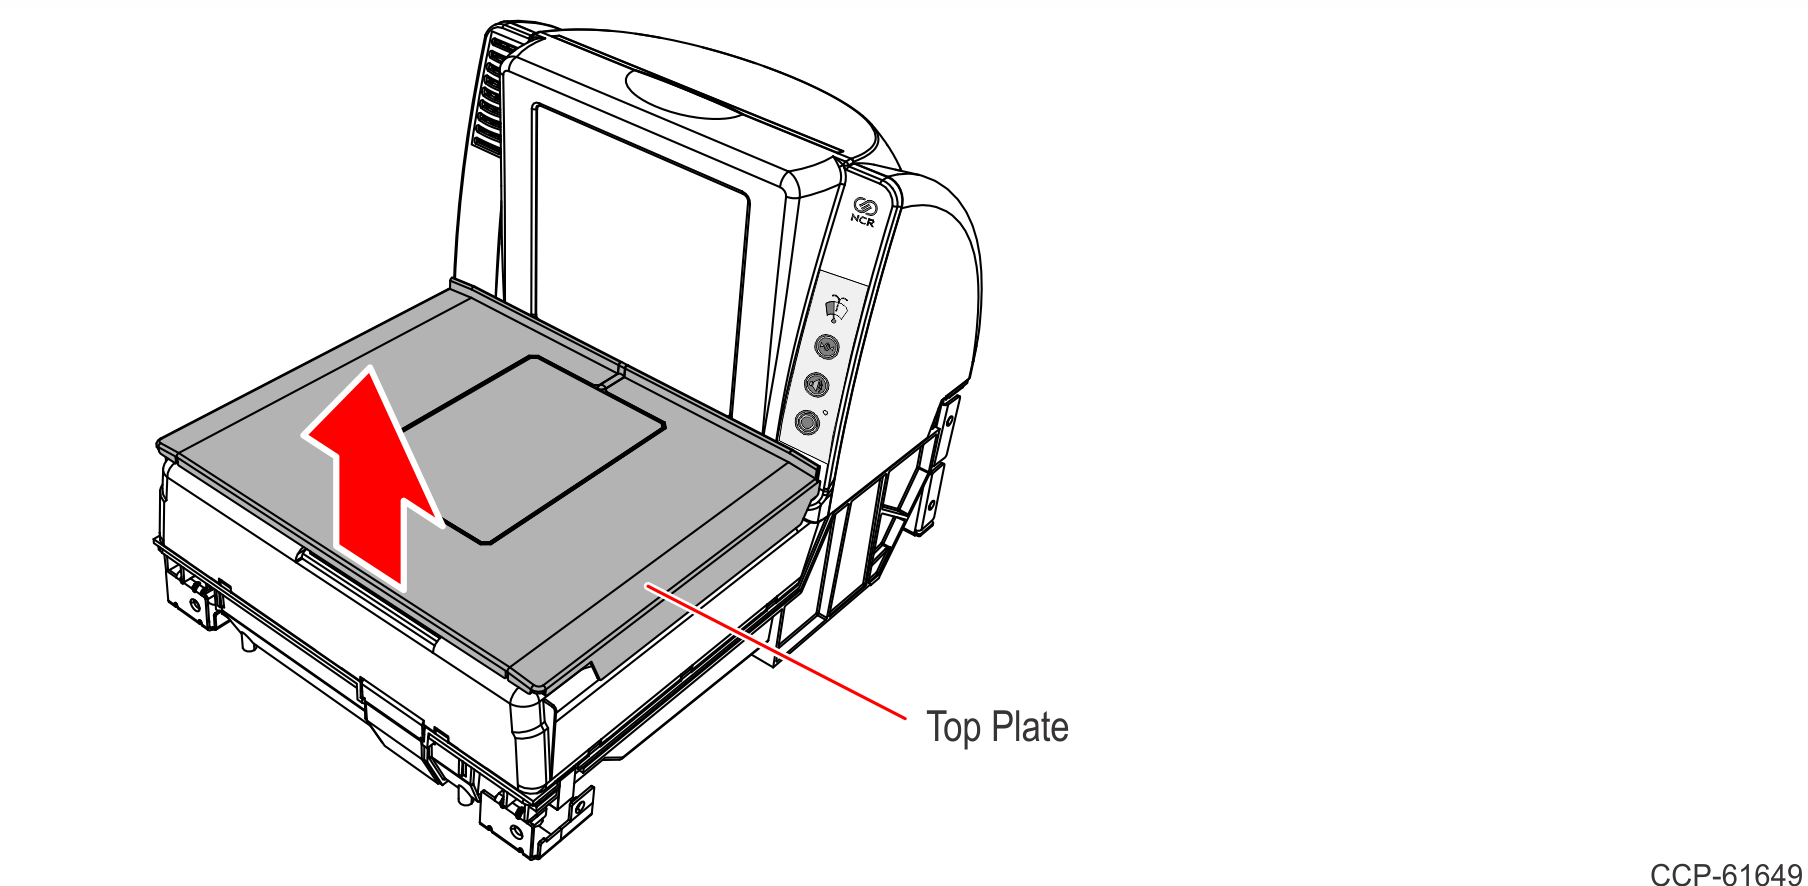
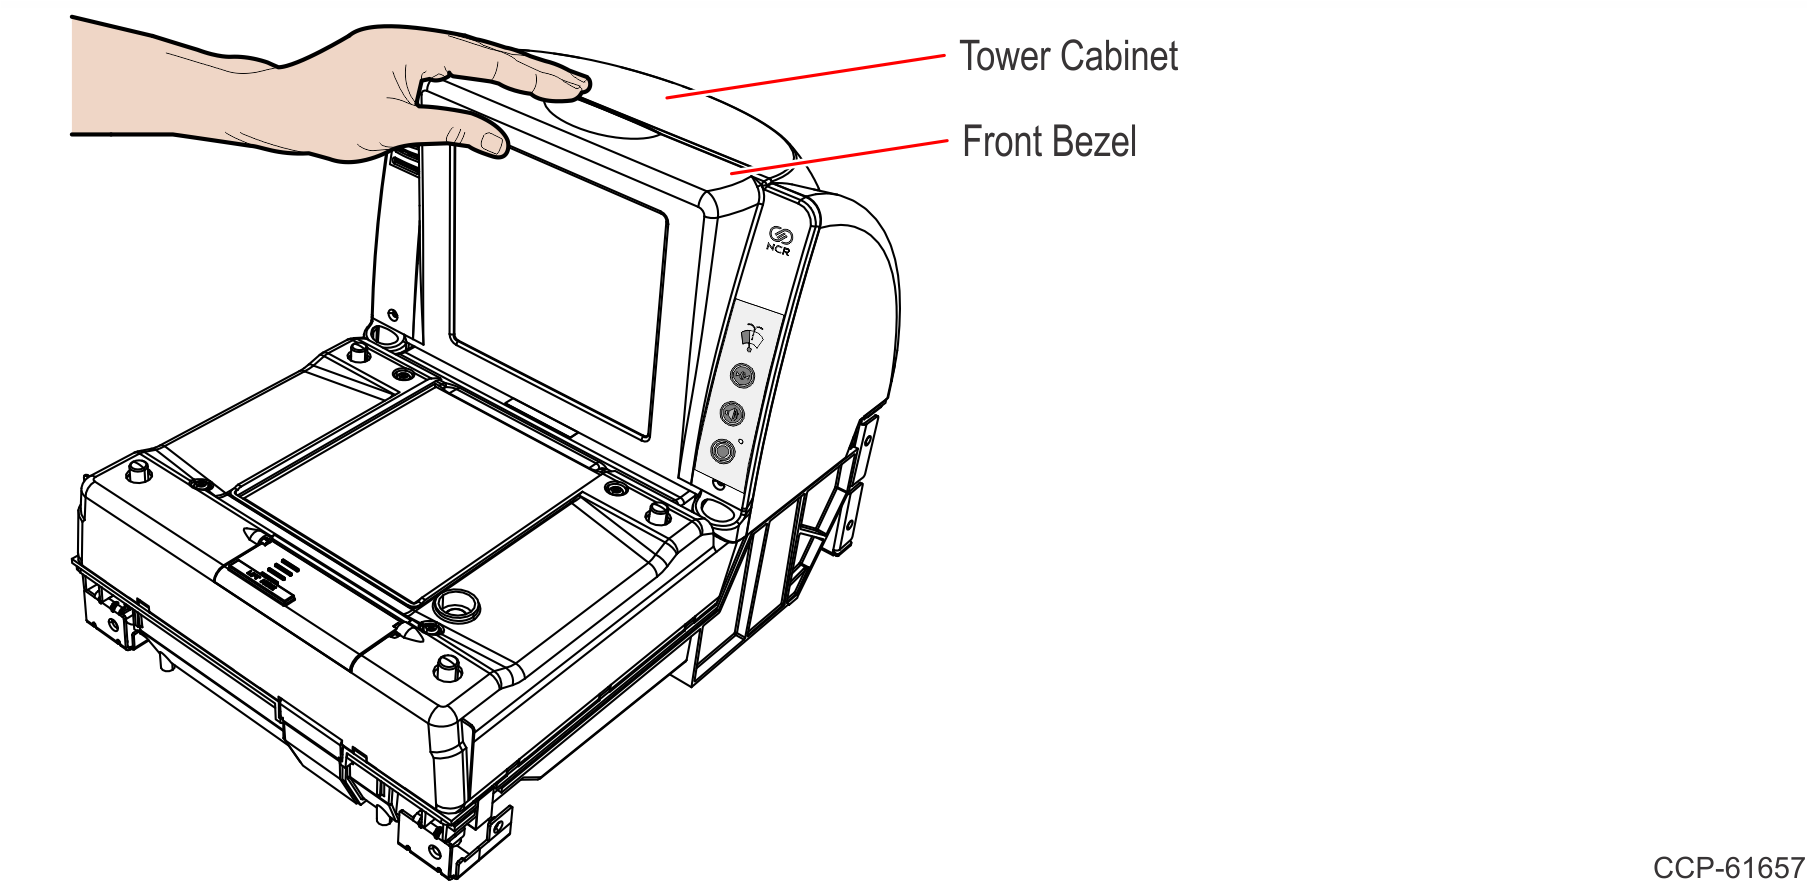
Remove the Top Plate
1.Hold the front edge of the Top Plate until your fingers are underneath it.
2.Lift the Top Plate to remove it from the Scanner.
3.If the Scanner is in a Checkstand, lift out the Scanner by grasping the back of the Tower Cover with one hand and the plastic Calibration Switch Cover with the other hand.

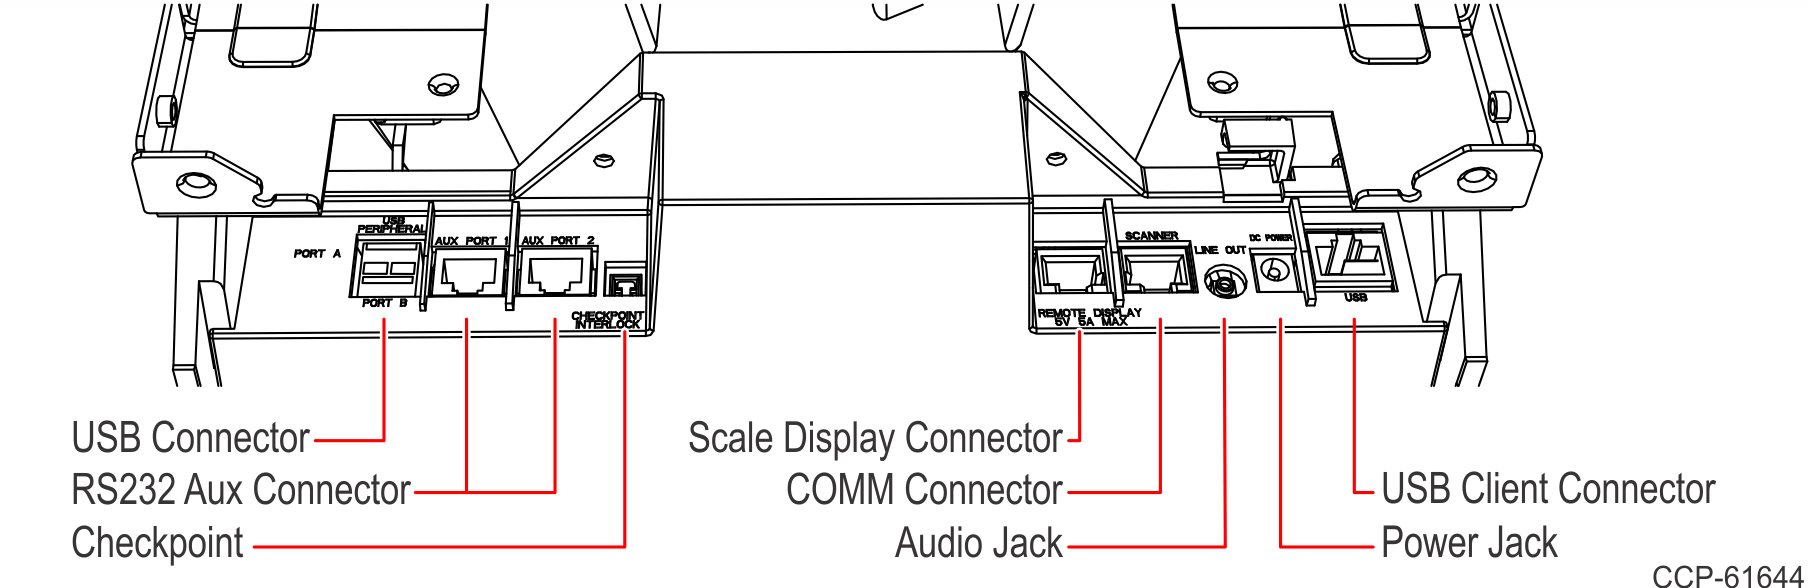
4.Disconnect all cables from the back of the Scanner.
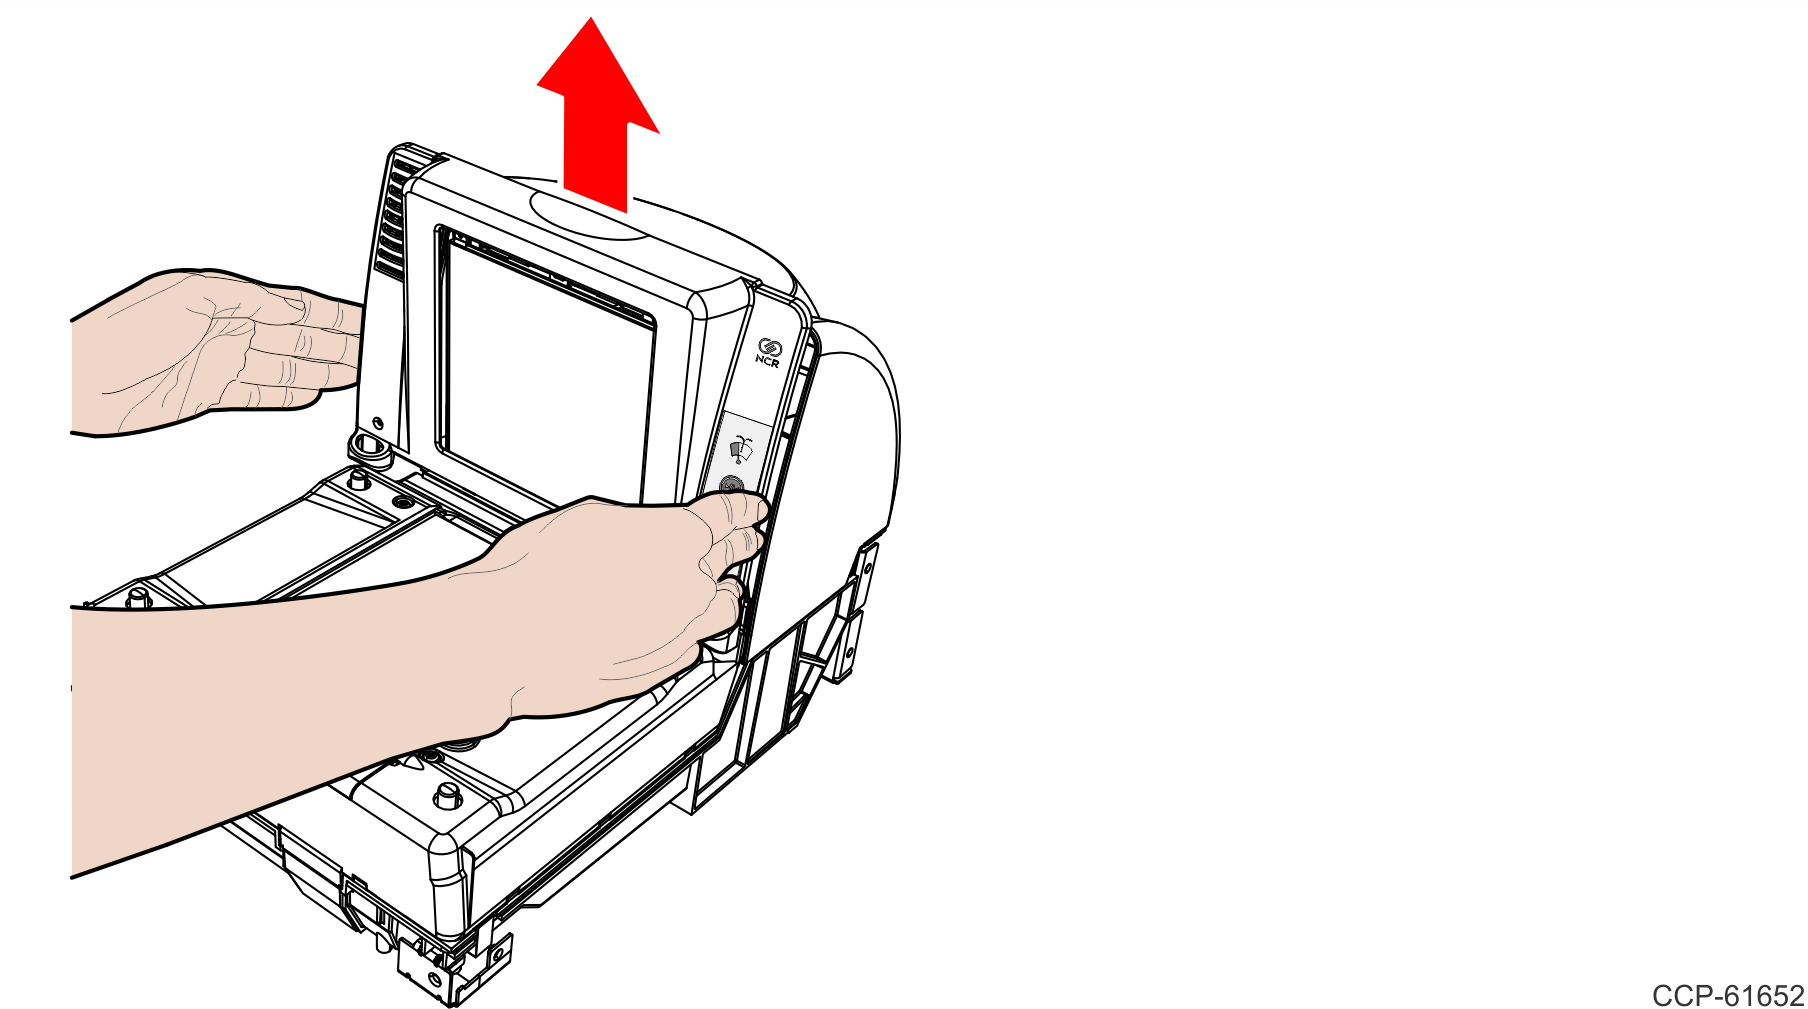
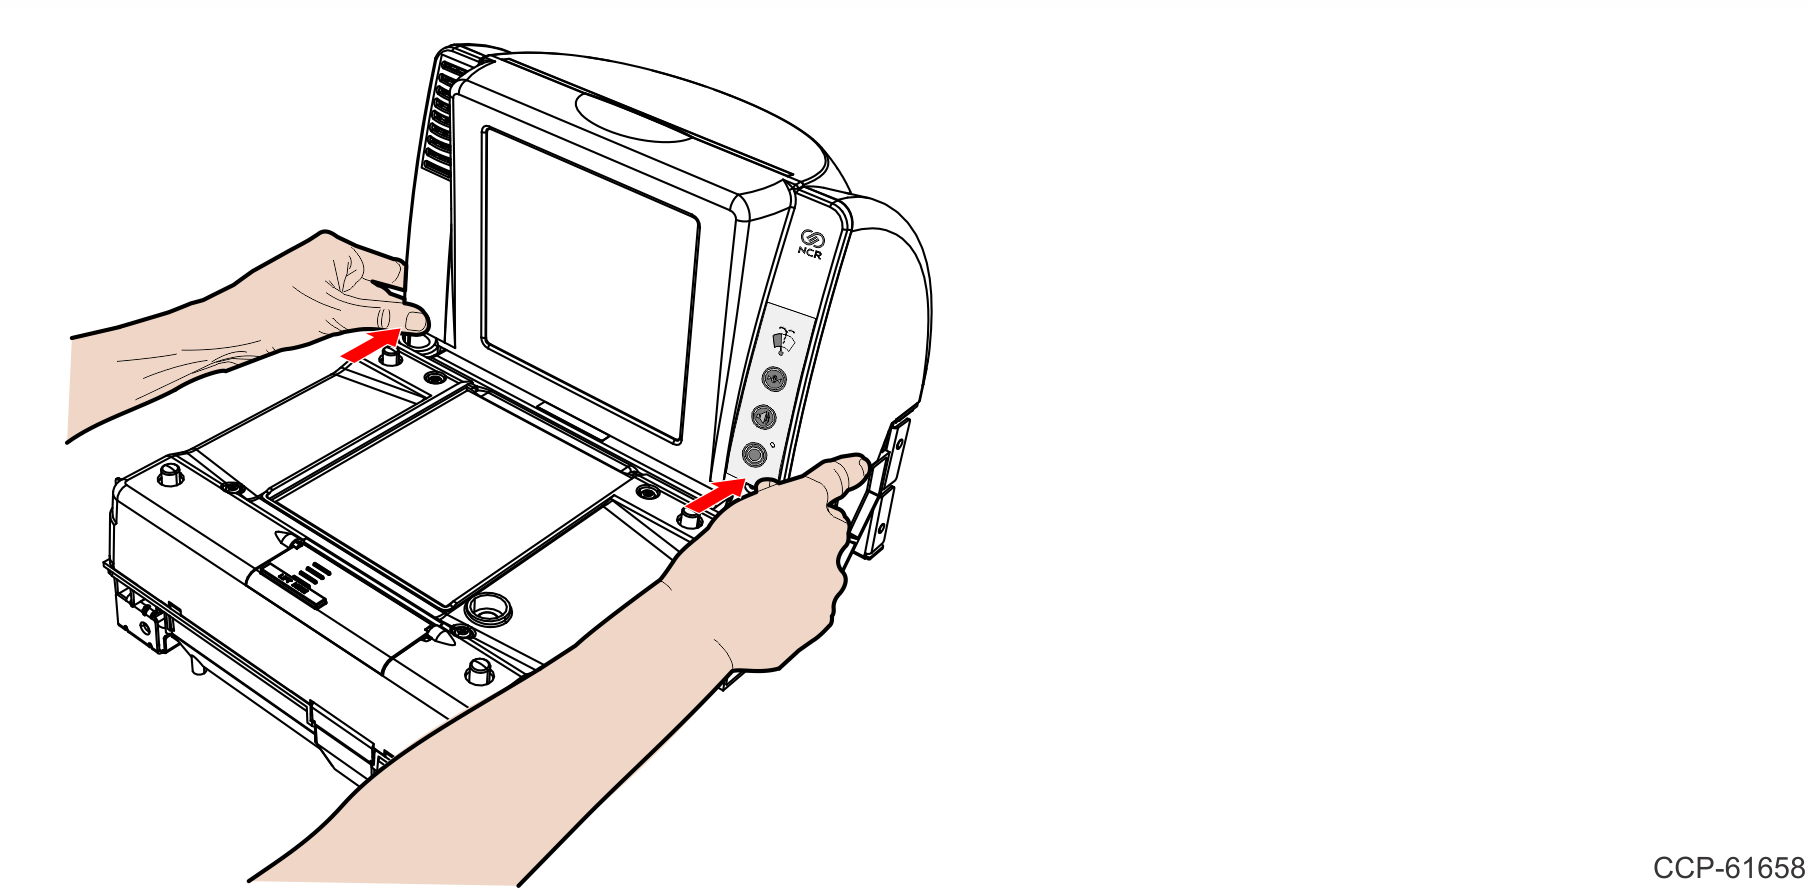
Remove the Front Bezel
1.Place one hand and slightly apply pressure on the top corner of the Front Bezel and use the other hand to pull the snap features at the bottom.
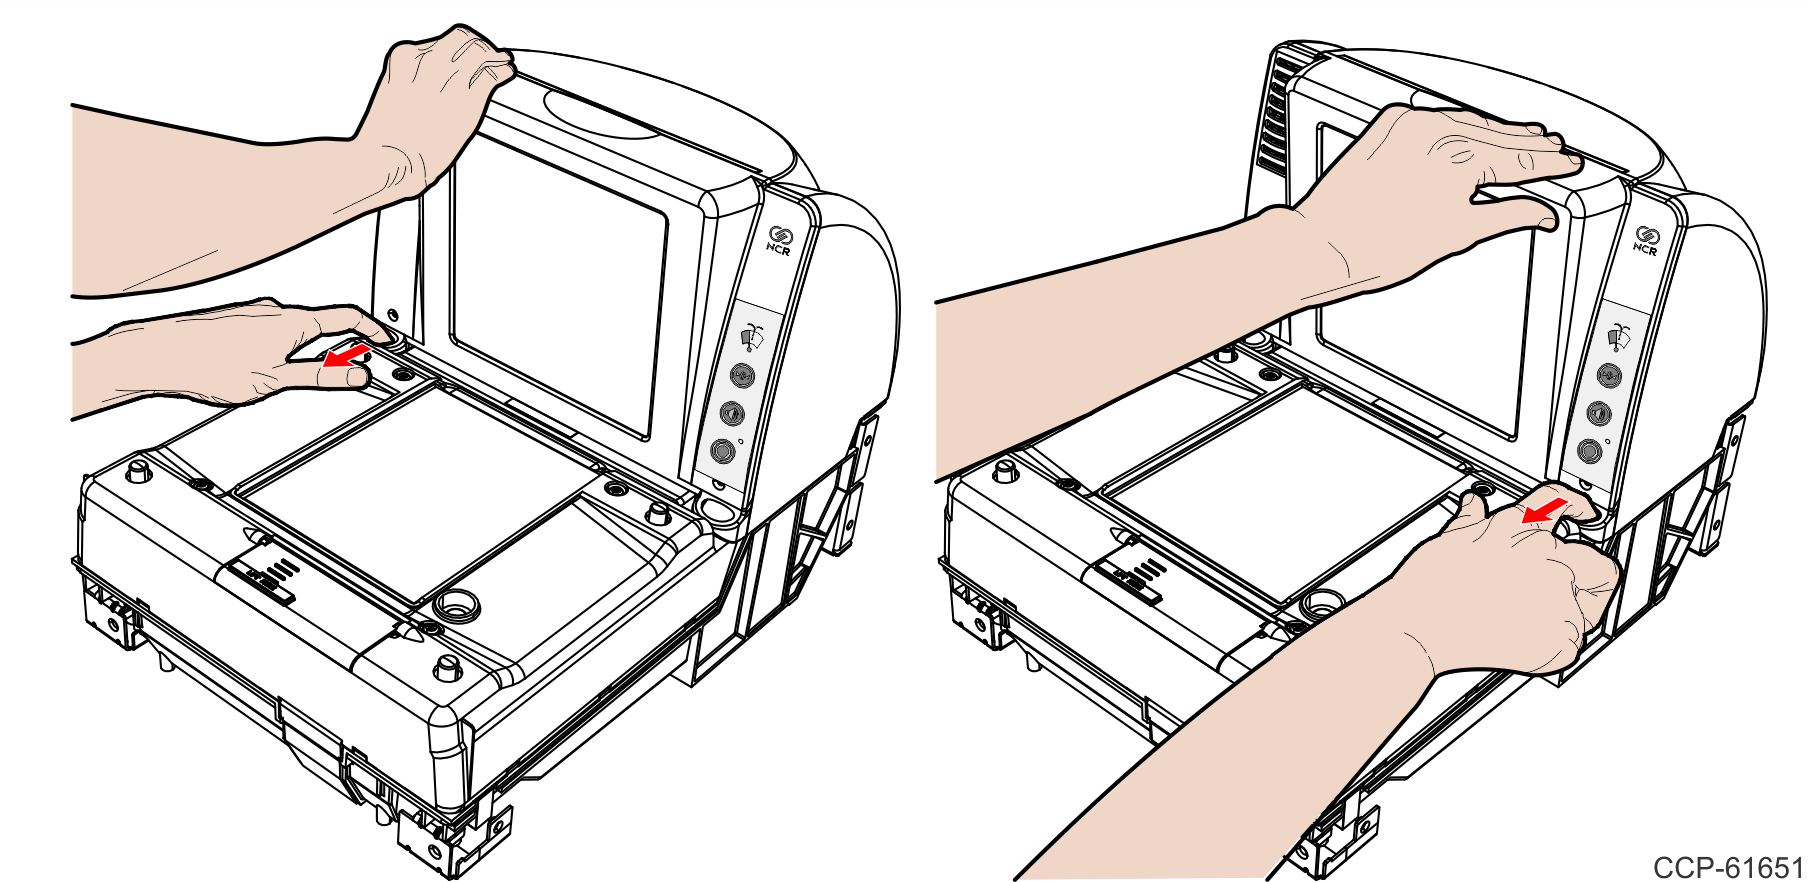
2.Lift the Front Bezel straight up to remove it from the Inner Tower.
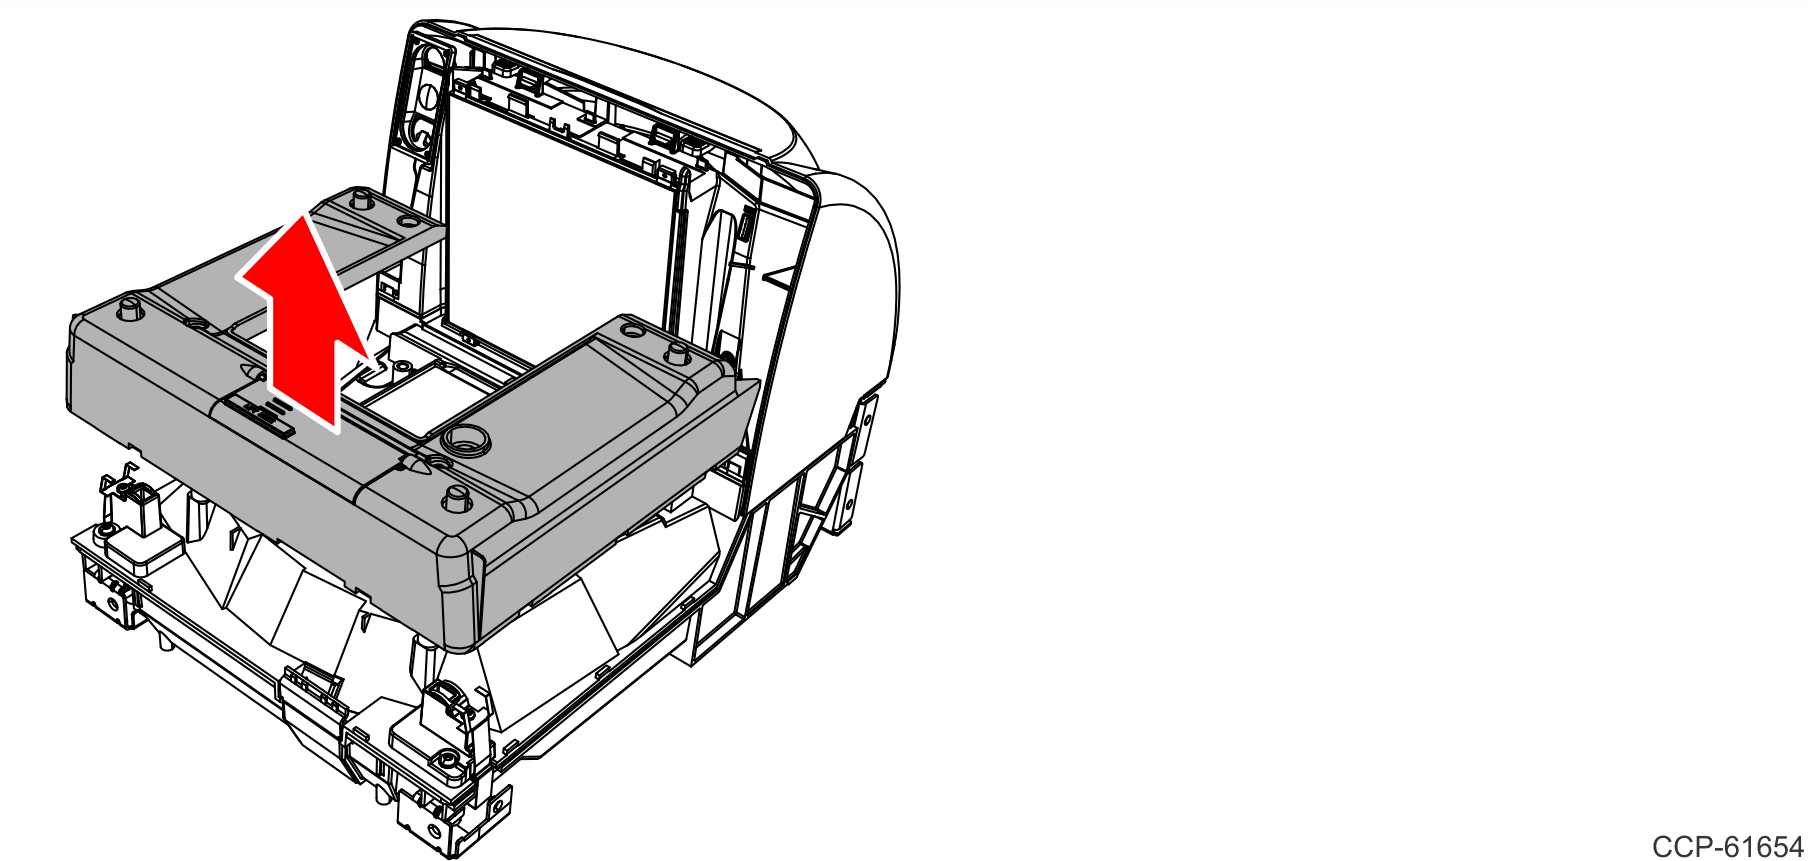
Remove the Existing Debris Guard
1.Remove the four screws securing the Debris Guard.
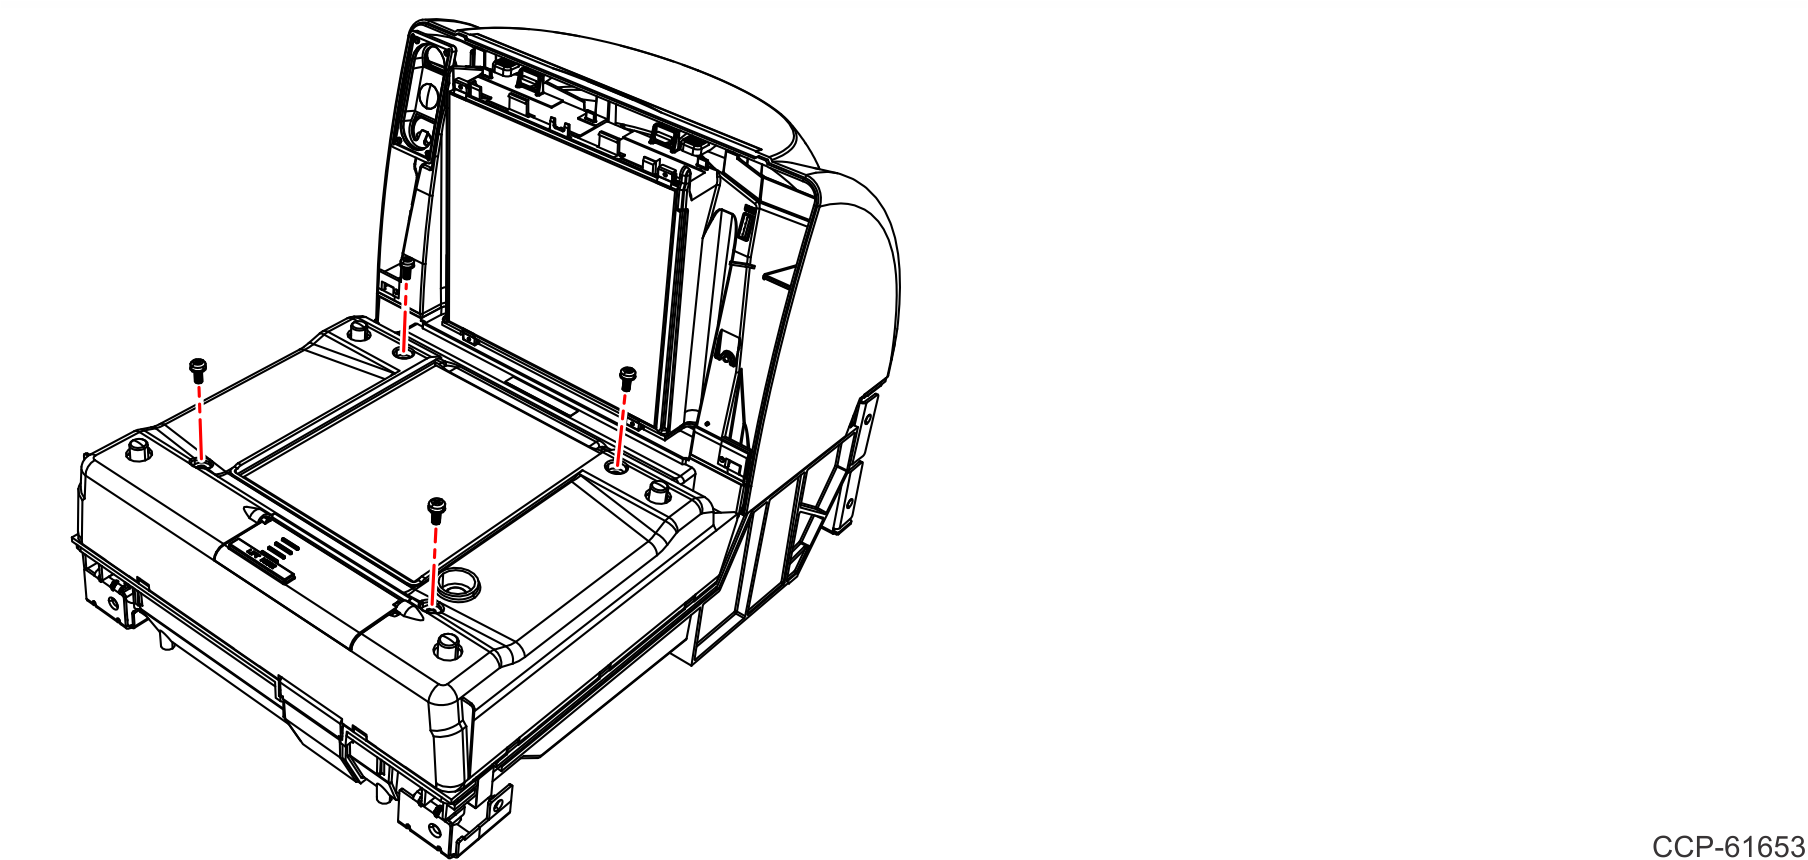
2.Lift the existing Debris Guard and remove it from the unit.
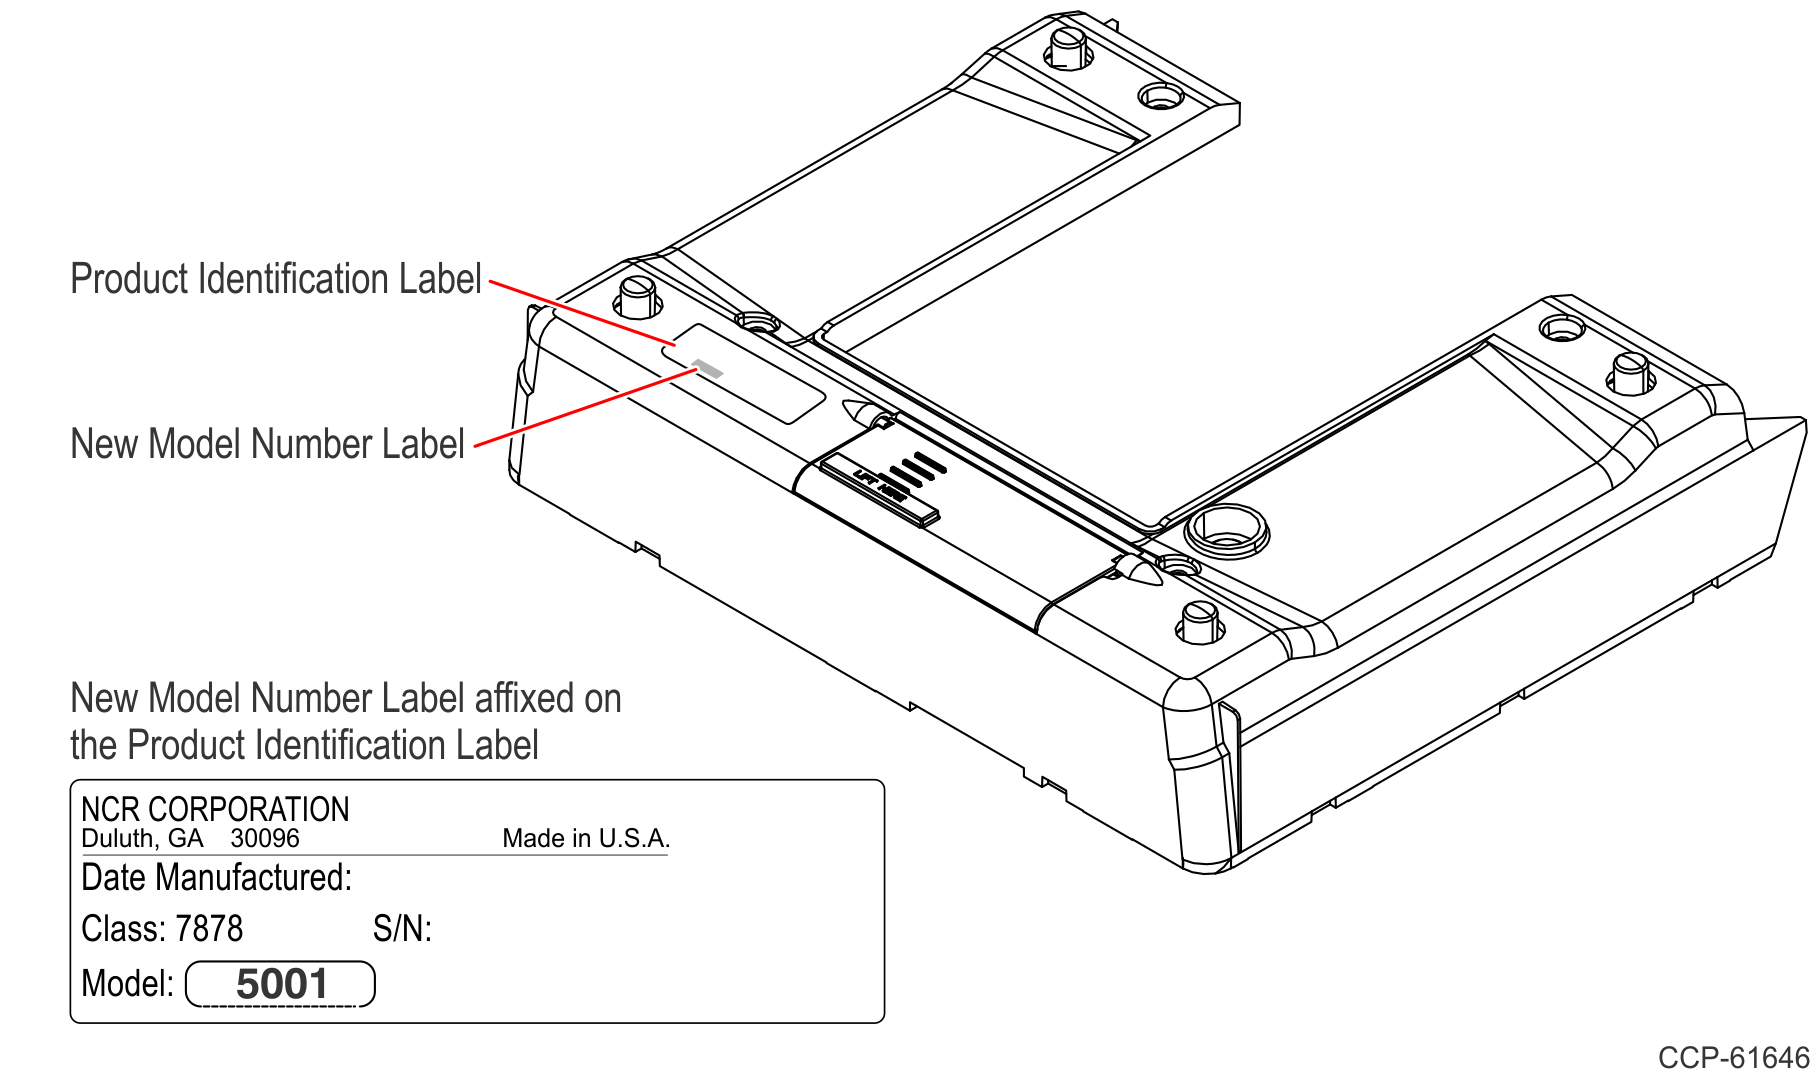
Label Placement
1.Tear off the New Model Number Label along the kiss cut line.
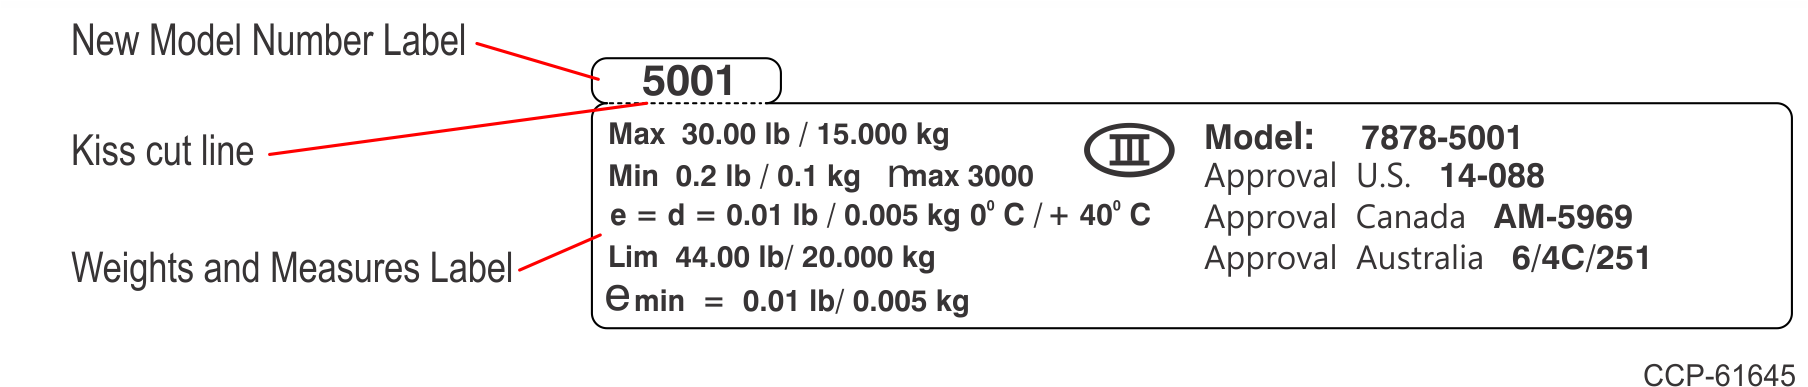
2.Affix the New Model Number on the Product Identification Label of the Scale Assembly. Apply the smaller Clear Overcoat (497-0451382) over the Identification Label to protect the printed information.
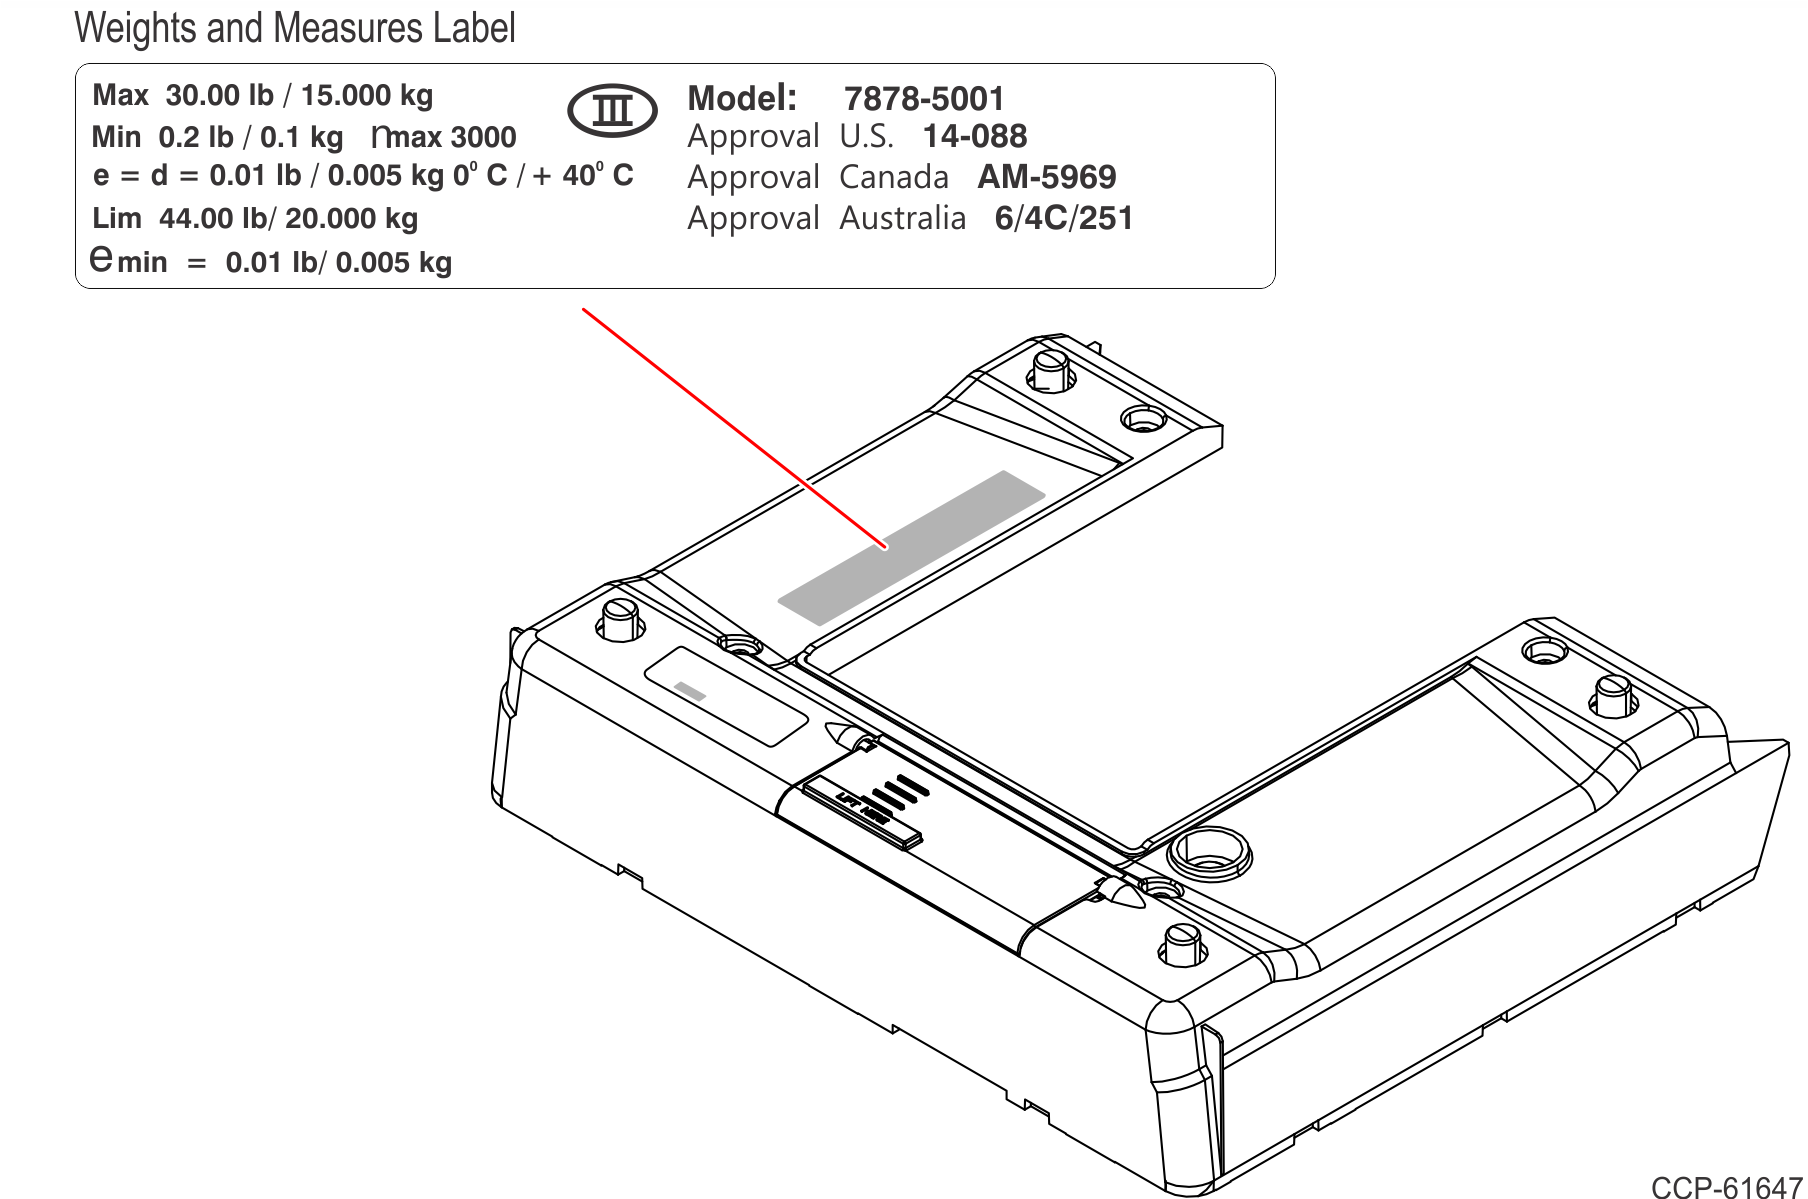
3.Affix the Weights and Measures Label as shown. Apply the larger Clear Overcoat (497-0444263) over the Weights and Measures Label to protect the printed information.
4.Notify local Weights and Measures Authority of new scale install per local requirements.
Install the New Scale Assembly with Debris Guard
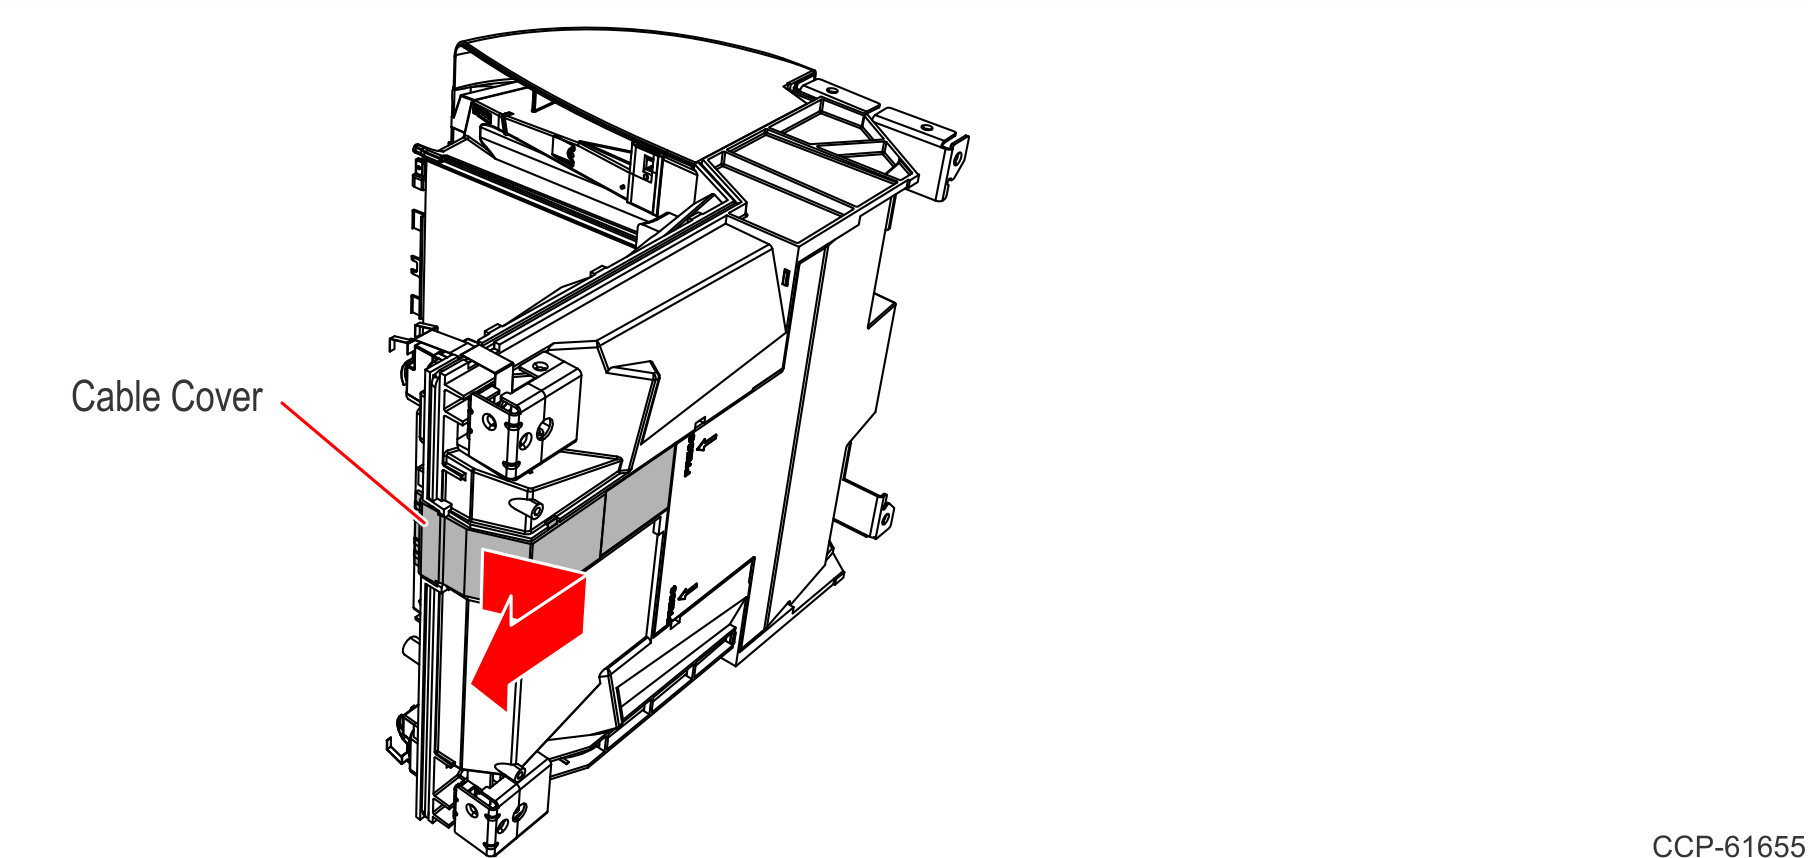
1.Lay the Scanner on its side and remove the Cable Cover by pressing the front end down then pulling the Cable Cover off.
2.Set the Scanner upright.
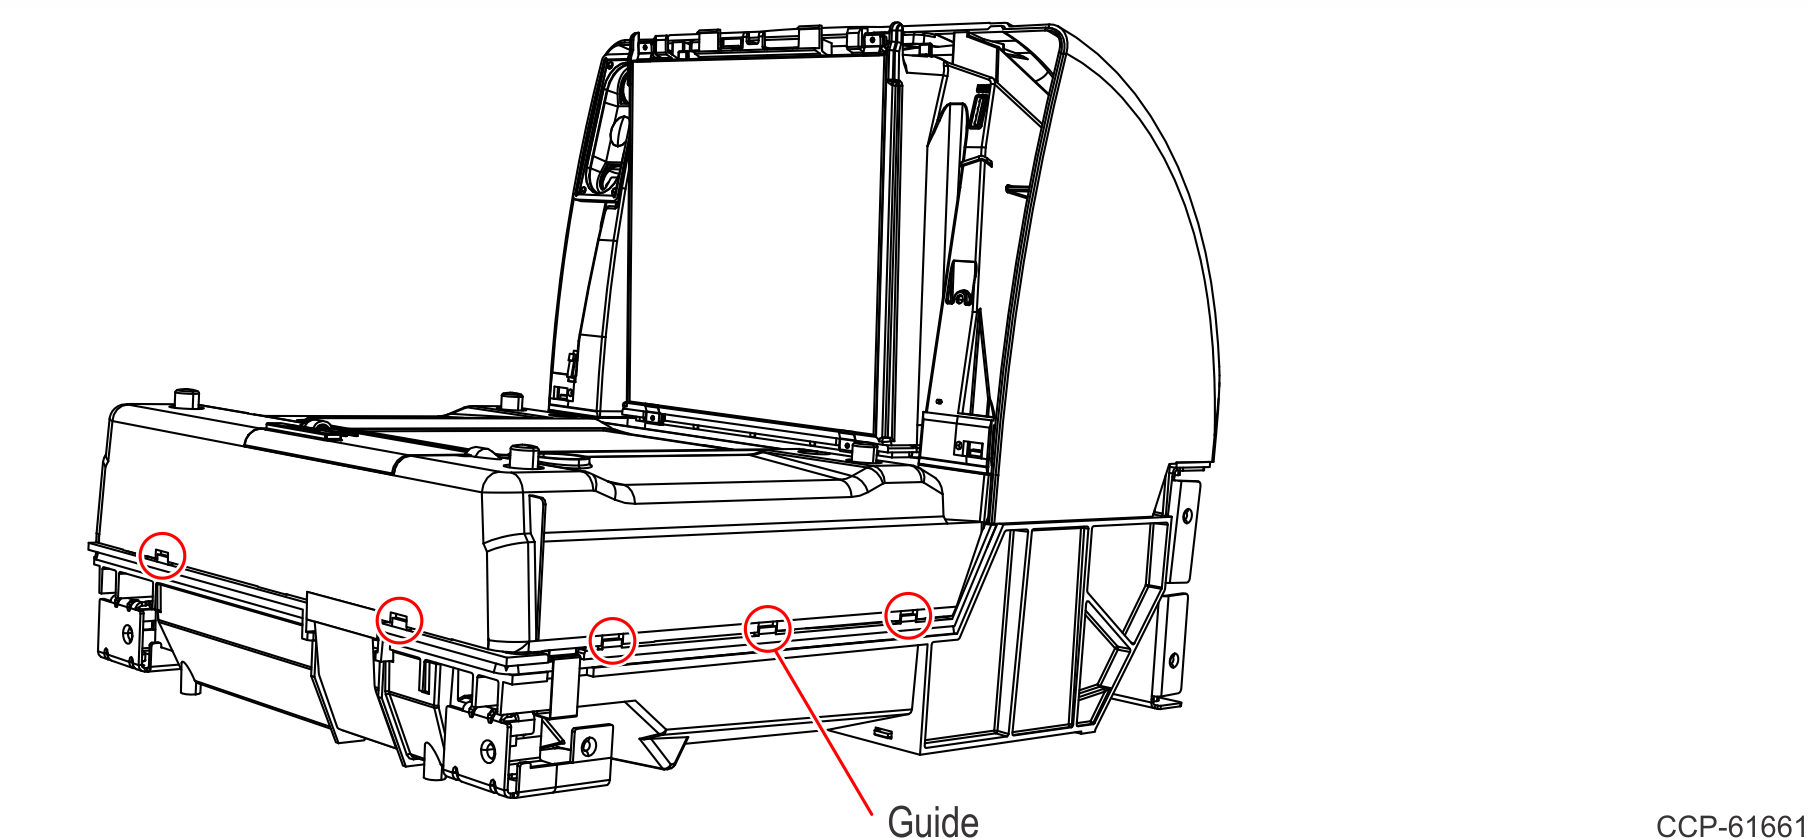
3.Lower down the back of the new Scale Assembly with Debris Guard (497-0504177) at a slight angle and connect the mating connector to the front of the Scale Assembly.

4.Press down the front of the Scale Assembly onto the unit.
Note: Check the guides along the sides for proper alignment.
5.Install the four screws (006-8612066) to secure the Scale Assembly.
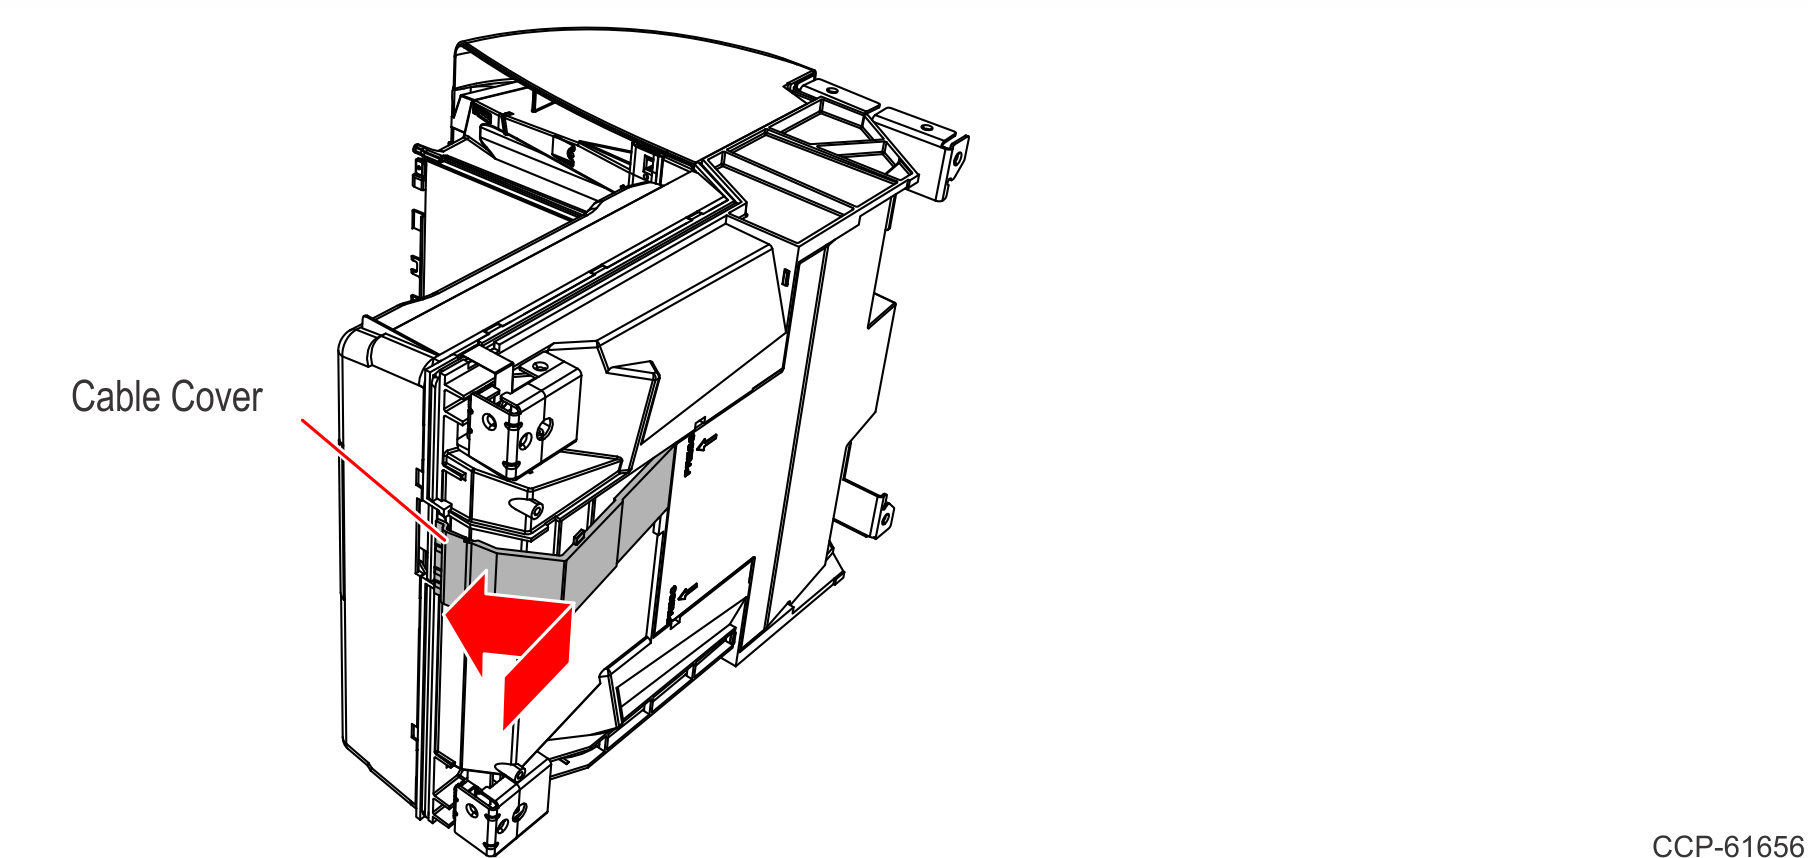
6.Lay the Scanner on its side and reinstall the Cable Cover by sliding the back end of the Cable Cover in then snapping the front end in place.
7.Set the Scanner upright.
Install the Front Bezel
1.Align the top edge of the Tower Cabinet with the top edge of the Front Bezel.
2.Apply pressure on the bottom‐left and bottom‐right corners of the Front Bezel to latch it in place.
3.Connect the external cables to the Scanner.
4.If applicable, reinstall the Scanner to the Checkstand. Grasp the back of the Tower Cover with one hand and the plastic Calibration Switch Cover with the other hand, then lower down the Scanner into the Checkstand.
Install the Top Plate
1.Lower the back edge of the Top Plate onto the two back Support Posts on the Scanner.
2.Holding the front edge, lower the front of the Top Plate onto the two front Support Posts.
Scale Calibration
Note: Only certified personnel can perform the scale calibration procedure and place the scale into service for trade to comply with governmental weights and measures regulations.
The 7878 Scale must meet the following accuracy requirements:
•The 7878 is considered a new unit each time the scale is calibrated. This status lasts for thirty (30) days.
•The 7878 is considered an in–service unit 30 days after the scale is calibrated.
|
Weight |
New Unit |
In Service Unit |
|---|---|---|
|
Up to 2.500 kg |
± 0.000 kg |
± 0.005 kg |
|
Above 2.500 kg |
± 0.005 kg |
± 0.010 kg |
|
Up to 5.000 lb |
± 0.000 lb |
± 0.010 lb |
|
Above 5.000 lb |
± 0.010 lb |
± 0.020 lb |
During factory testing, the scale is calibrated one or more times to test the scale calibrating function, although this is not sufficient to make the scale ready for weighing in trade.
The scale must be calibrated when any of the following events occur (this is a government requirement):
•Initial installation of a 7878
•When the scale cannot be zeroed
•When the diagnostics indicate a calibration error
•When the Scale Assembly or Digital Board has been replaced
The calibration procedure sets the scale and the electronics to interpret the weight of an item accurately. The scale can be calibrated after power has been supplied for 30 minutes and if the ambient air condition has been 20°C (68°F) or above for at least 24 hours. If the ambient air condition has not been met (that is, below 20°C (68°F)), then the scale must be on for at least 6 hours before it can be calibrated. One or more certified weight sets are required to calibrate and certify the scale. The following are examples:
•Whole Pound Weight Set: NCR Part Number 998–0633009
•Fractional Pound Weight Set: NCR Part Number 998–0633012
•Kilogram Weight Set: Obtain locally
The 7878 maintains an audit trail of scale calibration and weighs parameter setting. The audit trail consists of two event counters. Display the audit trail count by pressing and holding the Scale Zero button on the Operator Display Panel. The display alternates between Cal xxx and Par xxx. The Cal value is the number of times the scale has been calibrated. The Par value is associated with the weigh parameter setting and should never change.
Note: The audit trail displays only on units with the RealScan 25 (7825) Remote Display.
These are the general steps to calibrate the scale:
1.Enable the Scale.
2.Exercise the Scale.
3.Calibrate the Scale.
4.Verify the Scale's accuracy.
5.Secure the Calibration Switch.
For detailed instructions, refer to the succeeding sections.
Enable the Scale
1.If the 7878 has never been fitted with a scale before, scan the following Programming Tags in sequence to enable the scale:
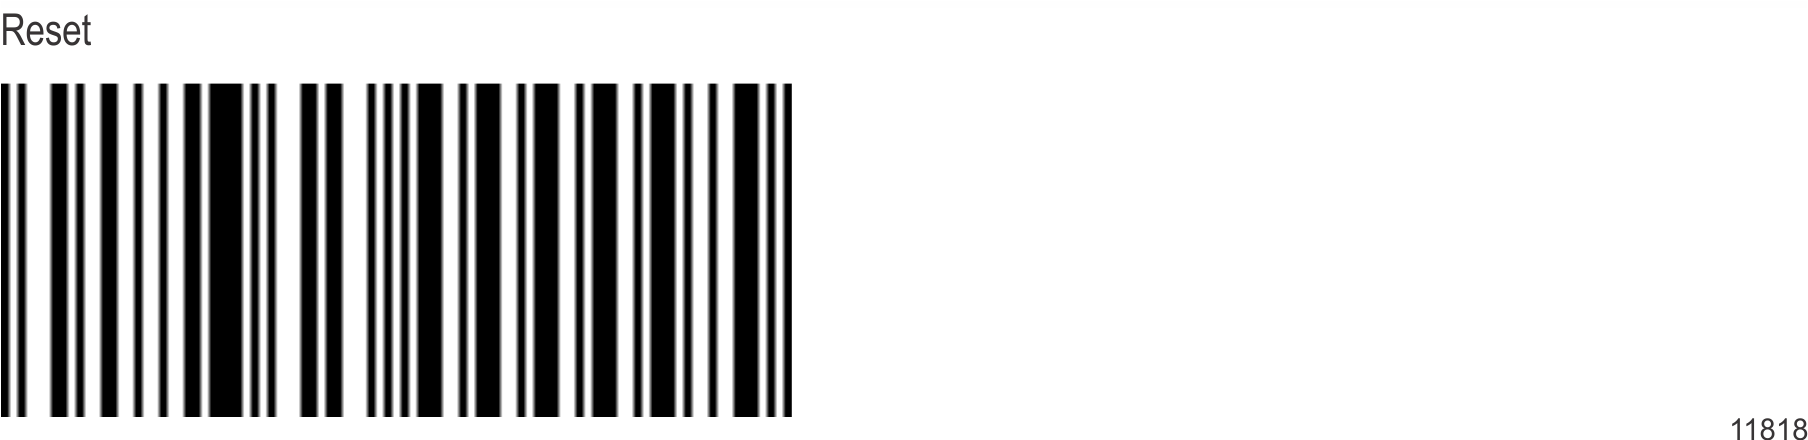


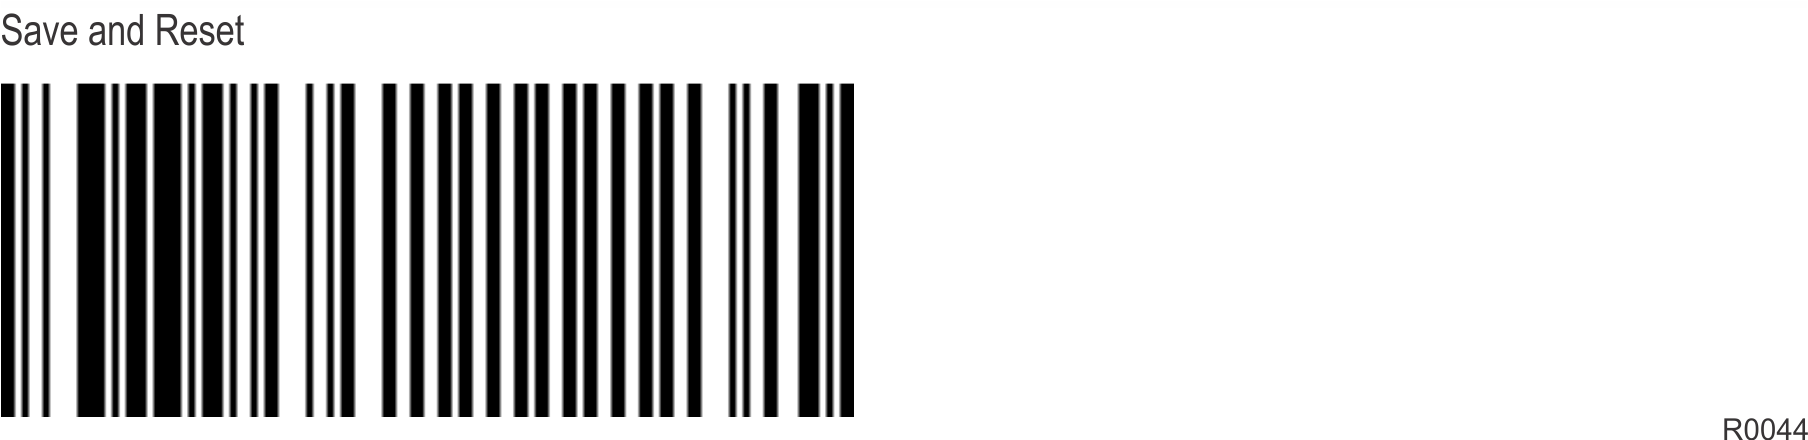
Note: Once the Programming Tags have been scanned, the 7878 will likely return an error. Proceed to the next step.
2.The Scale can be programmed in either kilograms or pounds. Scan the Programming Tags in sequence for the desired weight feature.
Kilograms

Pounds

Note: Once the Programming Tags have been scanned for the desired weight feature, the Scanner speaks "Enter Kilogram Calibration" or "Enter Pound Calibration". Proceed to the next section: Exercise the Scale.
Exercise the Scale
The scale must be exercised before performing a calibration. Ensure the scale is level and sitting upon four solid points of contact in a vibration–free checkstand with no airflow overhead.
1.Apply power to the 7878 if it is off. The unit needs to be ON for 30 minutes prior to calibration, unless it is cool in the environment (below 20°C (68°F)), in which case the scale must be on for at least 6 hours before it can be calibrated.
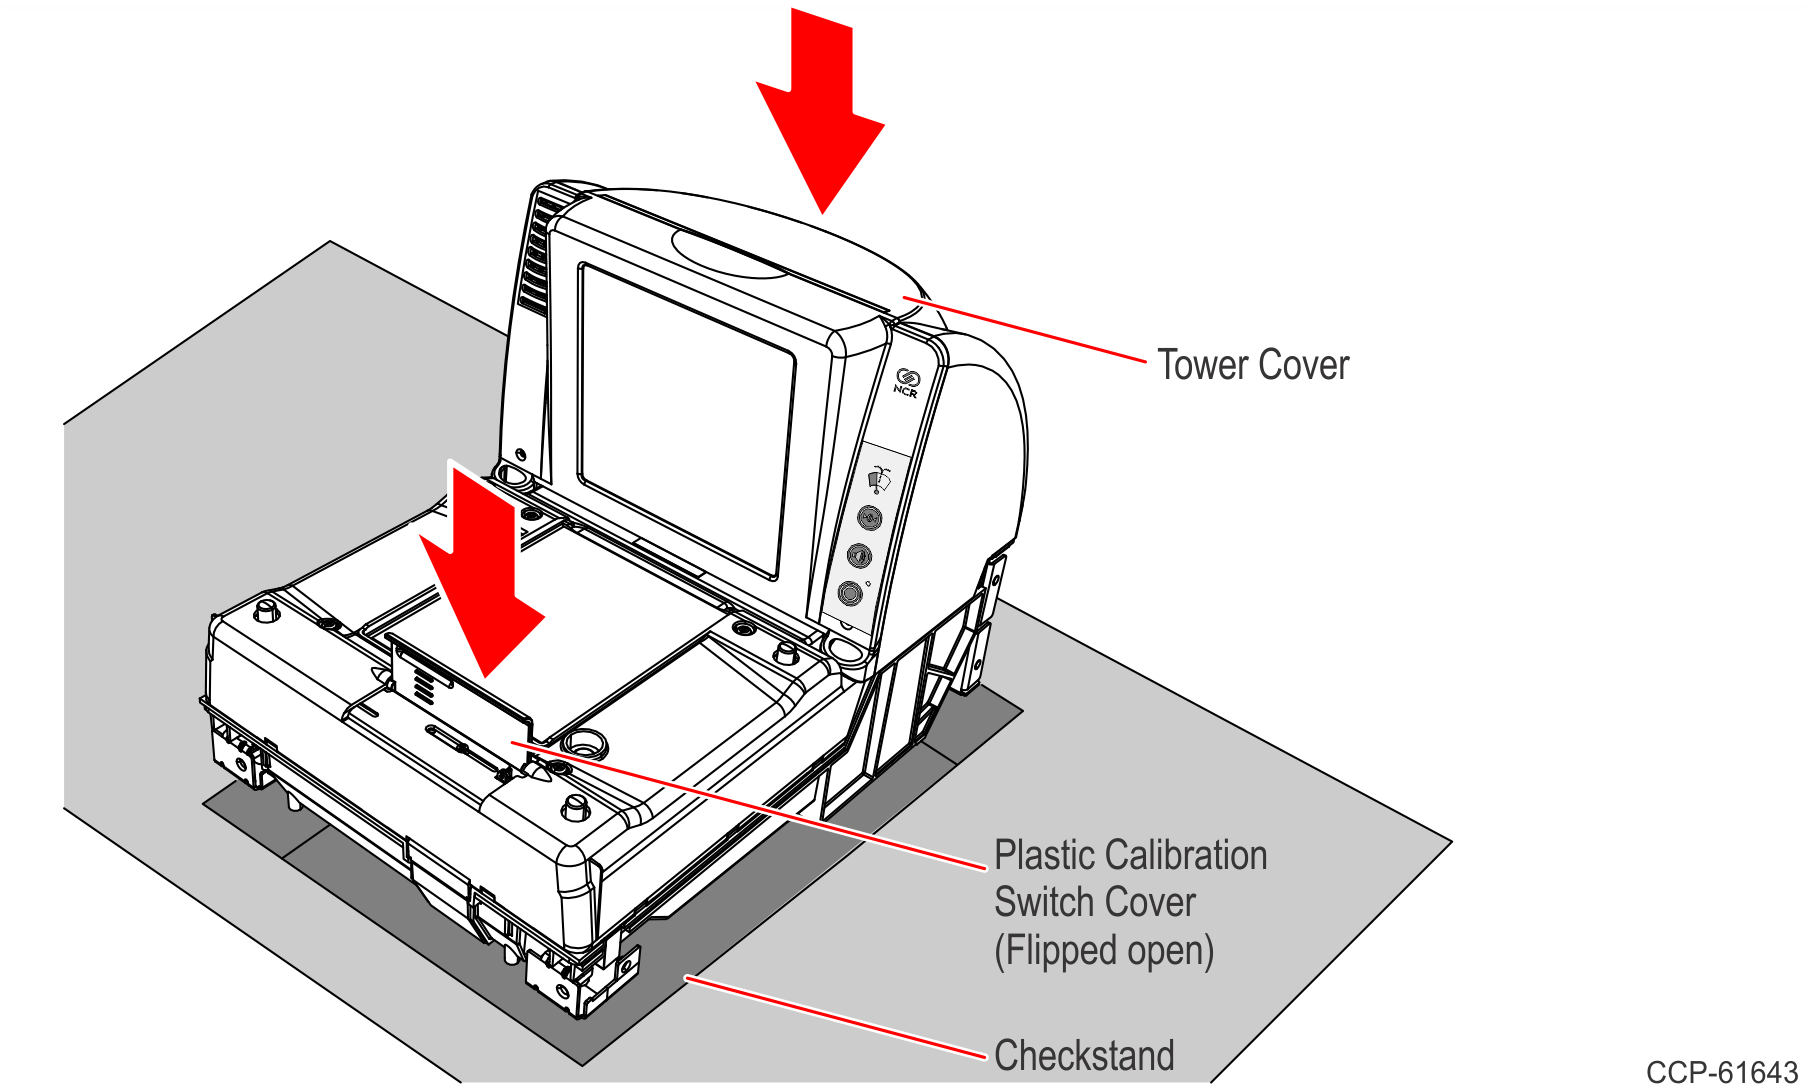
2.Remove the Top Plate.
3.Lift the plastic Calibration Switch Cover located on the front of the unit.
Note: If the metal Scale Calibration Switch Security Cover is secured with a lead/wire or paper seal, remove the seal.
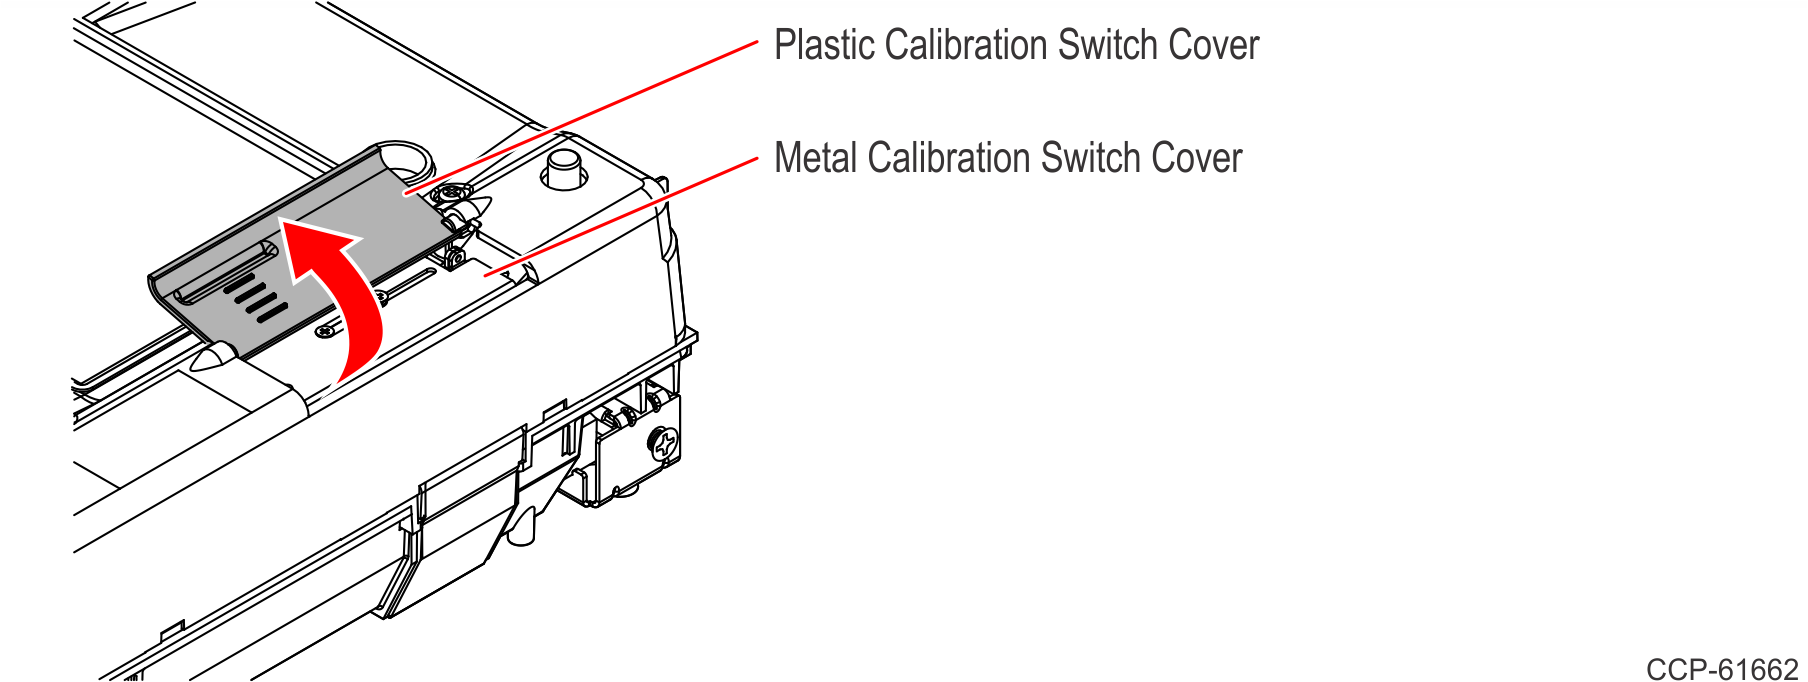
4.Loosen the screw indicated below and slide the metal Calibration Switch Cover to the left to access the small blue Calibration Switch Button.
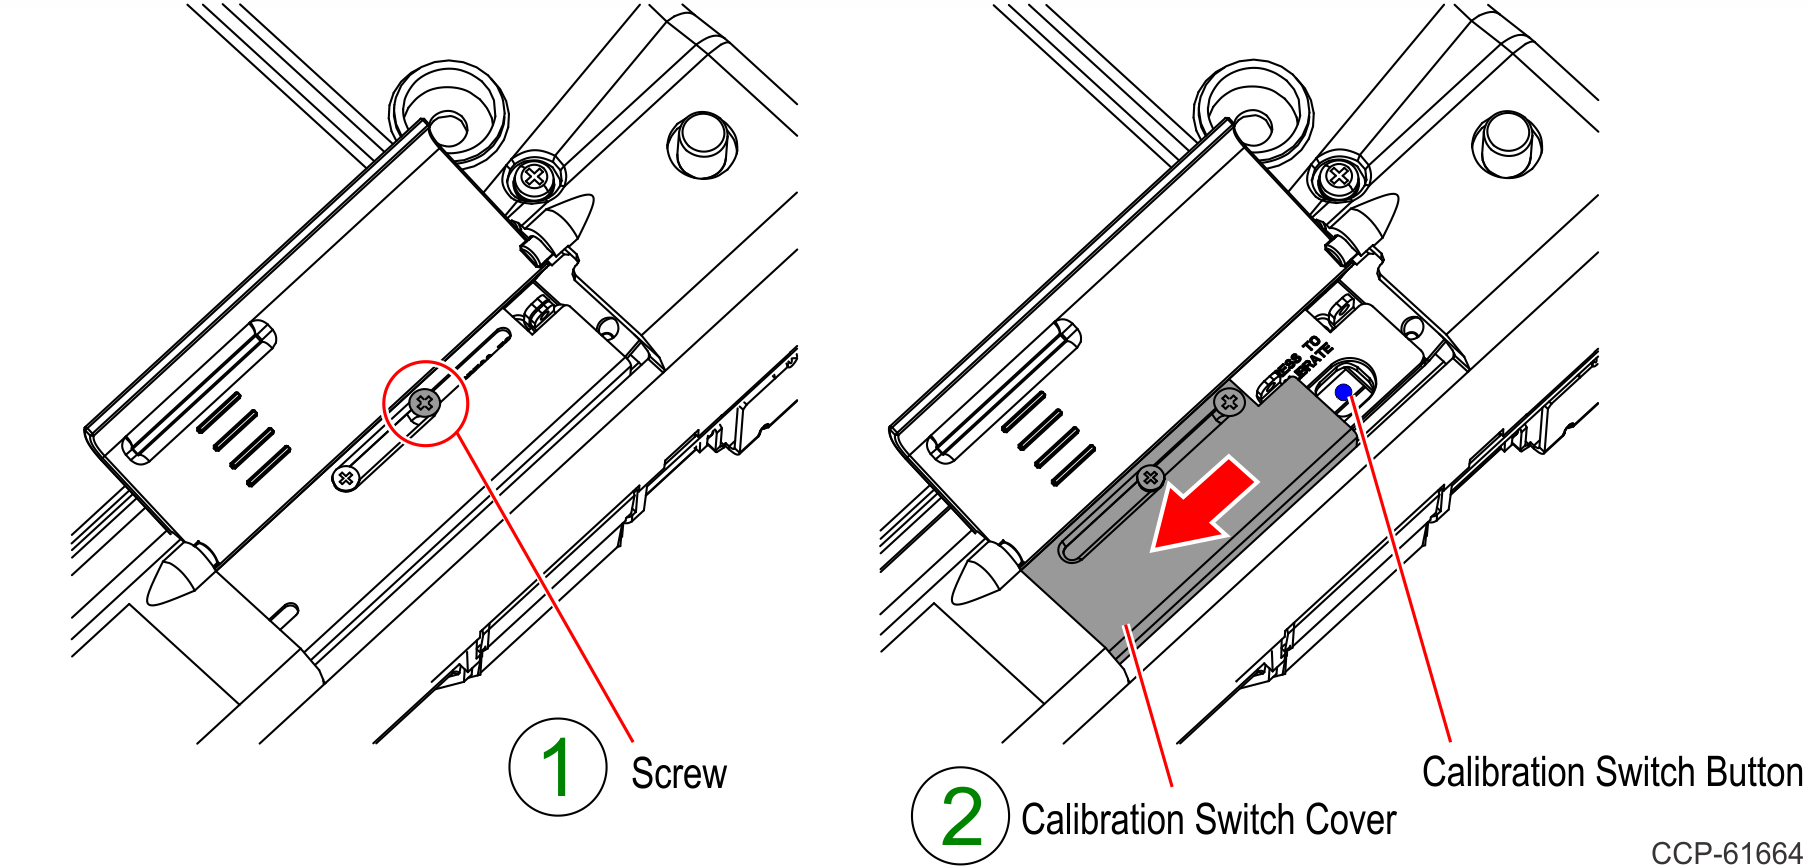
5.Press the small blue Calibration Switch Button (this button is very small and very recessed). When you press the button, the scanner speaks “Press Deck”. The unit will immediately begin a continuous clicking sound along with a steady tone.
Note: You must replace the Calibration Switch Cover and Top Plate, and complete the scale exercise procedure within 90 seconds. If not, the scanner will report a ‘Calibration Error Code 8’ and you will see 1 blue and 1 green LED on the Light Bar.

6.Perform the Press Down Procedure.
Note: You will need to perform the Press Down procedure twice, otherwise, the unit will report ‘Calibration Error Code 8’.
a.Once the Top Plate is back on and all the LEDs in the tower Light Bar are off, use both hands and press down hard on the Top Plate with a constant and increasing pressure.
Note: It will take a lot of pressure. You might have to fully lean on the scale – you will not break it. The goal is to light all 5 LEDs and keep them on for 4 seconds.
b.As you press on the scale deck, an increasing number of LEDs will turn on indicating the amount of pressure you are applying.
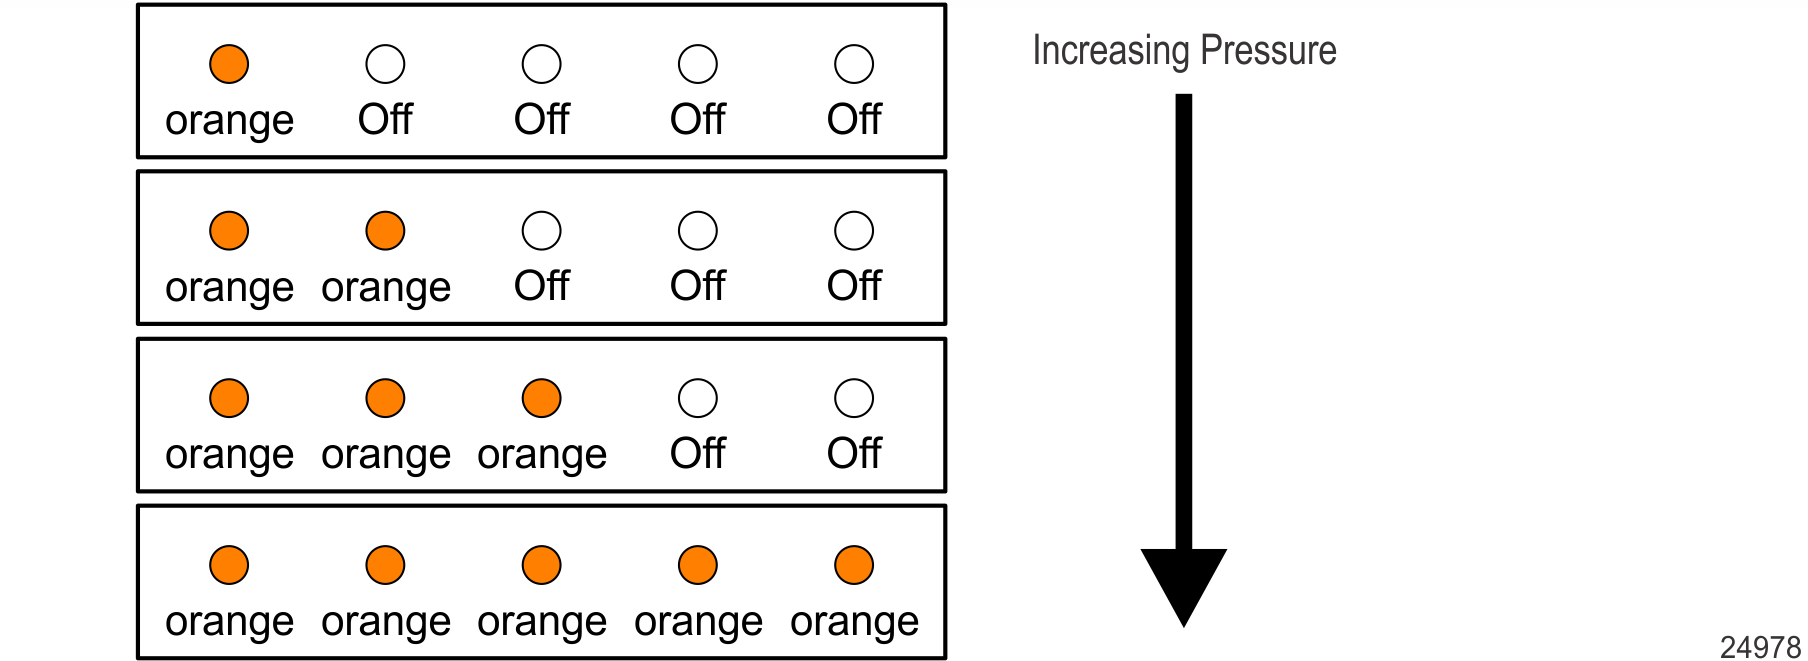
c.As you press, the tone also increases in pitch, producing a different, higher tone for each additional LED that lights up. If you let go, the tone will decrease in pitch as the LEDs progressively turn off.
d.At the highest pitch, with all 5 LEDs on, you must continue pressing down with continuous consistent pressure until the 5 LEDs turn solid red and the scanner beeps four times.

e.Finally, the scanner will say “Complete” and all the 5 LEDs will turn solid blue. You can then release your hands from the deck.

f.Scanner will again say “Press deck”.
g.Repeat the Press Down steps again until the scanner says “Complete”.
7.Once the exercising is complete (Press Down done twice), the scanner will require a delay before continuing with calibration. It will say “Please wait 20 seconds…15 seconds…10 seconds…five seconds…complete”. There is a countdown shown on the RealScan 25 (7825) Remote Display if one is attached.
Calibrate the Scale
Note: If a protective plastic covering is present on the Top Plate, ensure that it is removed before calibrating the Scale.
The scale firmware controls the calibration procedure. It waits for a response to each prompt before going to the next step. The firmware uses the voice feature and the display to identify how much weight to place on the Top Plate. After the required weight has been placed on the Top Plate and the Scale Zero button pressed, the firmware sounds a single tone and goes to the next prompt.
The calibration procedure can be ended before completion by turning the unit off. However, if this is done, the scale must still be calibrated before placing it into service.
Note: The pound and kilogram weights used for calibration are not equivalent values. They are the actual weights the firmware needs to perform the calibration.
•For the Kilogram weight set, you must have a calibrated KG weight set, 12.5 kg total. Weight combinations 2.5 kg, 7.5 kg, and 12.5 kg are required, with suggested individual weights made up of a set of two 5 kg weights, one 2 kg weight, and one 500 g weight.
•For the Pound weight set, you must have a calibrated LB weight set, 30 pounds total. Weight combinations 5 lb, 15 lb, and 30 lb are required, with suggested individual weights made up of a set of two 10 lb weights, one 5 lb weight, two 2 lb weights, and one 1 lb weight.
Note: Turn off the EAS system (if present) before scale calibration.
The regular calibration procedure will begin after exercising is complete. Calibrate the scale according to the type of weight sets being used.
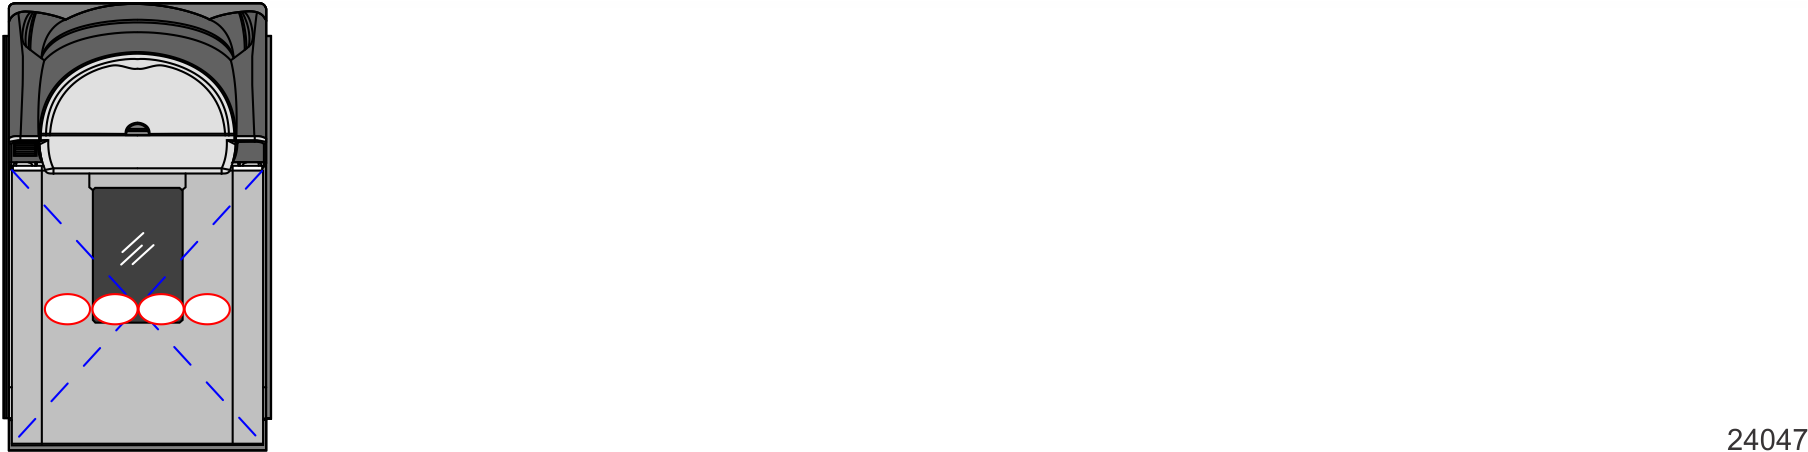
Note: Place weights in circles shown when calibrating to ensure even distribution of weight during calibration. Start at the center and work outward horizontally with increasing weight. Do not scatter weights around the Top Plate.
Calibration Using Kilogram Weights
1.Scanner speaks “Place zero kilograms on deck then press Scale Zero”. Make sure the scale has no weights on it (is empty) then press Scale Zero. Wait.
2.Scanner speaks “Place 2.5 kilograms on deck then press Scale Zero”. Put 2.5 kg on the scale then press Scale Zero. Wait.
3.Scanner speaks “Place 7.5 kilograms on deck then press Scale Zero”. Put 7.5 kg on the scale then press Scale Zero. Wait.
4.Scanner speaks “Place 12.5 kilograms on deck then press Scale Zero”. Put 12.5 kg on the scale then press Scale Zero. Wait.
5.Scanner speaks “Place zero kilograms on deck then press Scale Zero”. Take all the weights off the scale then press Scale Zero. Wait.
6.Scanner speaks “Calibration complete” upon successful calibration.
Calibration Using Pound Weights
1.Scanner speaks “Place zero pounds on deck then press Scale Zero”. Make sure the scale has no weights on it (is empty) then press Scale Zero. Wait.
2.Scanner speaks “Place 5 pounds on deck then press Scale Zero”. Put 5 lb on the scale center then press Scale Zero. Wait.
3.Scanner speaks “Place 15 pounds on deck then press Scale Zero”. Add 10 more pounds to make 15 lb on the scale then press Scale Zero. Wait.
4.Scanner speaks “Place 30 pounds on deck then press Scale Zero”. Add 15 more pounds to make 30 lb on the scale then press Scale Zero. Wait.
5. Scanner speaks “Place zero pounds on deck then press Scale Zero”. Take all the weights off the scale then press Scale Zero. Wait.
6.Scanner speaks “Calibration complete” upon successful calibration.
Calibration Error Codes
If Scan Doctor detects an error during the calibration procedure, one of the following error codes may be given:
|
Error Code |
Problem |
Suspect Components |
Light Bar Patterns |
|---|---|---|---|
|
1, 2, or 3 |
Possible out of range calibration error |
Digital Board Scale Assembly |
Error Code 1: LED 1 = blue LED 2 = orange LED 3 = orange Error Code 2: LED 1 = blue LED 2 = orange LED 3 = orange LED 4 = orange Error Code 3: LED 1 = blue LED 2 = orange LED 3 = orange LED 4 = orange LED 5 = orange |
|
4 |
Scale hardware error |
Digital Board Scale Assembly Scale Digital Cable |
LED 1 = blue LED 2 = red |
|
5 |
Scale Drift |
Digital Board Scale Assembly Scale Cables and Power Supply |
LED 1 = blue LED 2 = red LED 3 = red |
|
6 |
Failure to update parameters into EEPROM |
EEPROM Digital Board |
LED 1 = blue LED 2 = red LED 3 = red LED 4 = red |
|
7 |
Error reading parameters from EEPROM |
EEPROM Digital Board |
LED 1 = blue LED 2 = red LED 3 = red LED 4 = red LED 5 = red |
|
8 |
Scale exercising failed (not enough pressure or time consumed) |
Top Plate is bottoming out |
LED 1 = blue LED 2 = green |
|
9 |
Linearity problem or slight vibration noted while calibrating Scale (Zero Drift) |
Top Plate is touching Checkstand. Scale was jarred. |
LED 1 = blue LED 2 = gree LED 3 = green |
Verify Scale Accuracy
After calibrating the scale, the accuracy must be verified to assure it meets the government requirements. This consists of a series of four tests that must be run in the continuous sequence given.
1.Increasing Load Test
2.Over–Capacity Test
3.Decreasing Load Test
4.Shift Test
Increasing Load Test
This test checks the scaleʹs accuracy when incrementally adding weight to the center of the Top Plate. Use weights that correspond to the 7878 weight feature.
The following table lists the different steps in performing the Increasing Load Test.
|
Step |
Weight Feature |
Add Weight |
Remove Weight |
Display Result |
|---|---|---|---|---|
|
1
|
Kilogram |
0.100 kg |
|
0.100 ± 0.000 kg |
|
Pound |
0.20 lb |
|
0.20 ± 0.00 lb |
|
|
2
|
Kilogram |
2.500 kg |
0.100 kg |
2.500 ± 0.000 kg |
|
Pound |
5.00 lb |
0.20 lb |
5.00 ± 0.00 lb |
|
|
3
|
Kilogram |
5.000 kg |
|
7.500 ± 0.005 kg |
|
Pound |
5.00 lb |
|
10.00 ± 0.01 lb |
|
|
4
|
Kilogram |
5.000 kg |
|
12.500 ± 0.005 kg |
|
Pound |
10.00 lb |
|
20.00 ± 0.01 lb |
|
|
5
|
Kilogram |
2.500 kg |
|
15.000 ± 0.005 kg |
|
Pound |
10.00 lb |
|
30.00 ± 0.01 lb |
Note: Do not remove any weight from the Top Plate between test steps unless directed to do so.
Over–Capacity Test
This test checks for the proper indication from the scale when too much weight is placed on the Top Plate.
Note: This test must immediately follow the Increasing Load Test; do not remove any of the weights from the previous test prior to running this test.
Note: Scale capacity is 30 lb or 15 kg in 0.01 lb or 0.005 kg increments.
Place additional weight on the center of the Top Plate as shown in the following table. Use the weight that corresponds to the 7878 weight feature. The display shows a series of dashes to indicate an over–capacity condition.
|
Step |
Weight Feature |
Add Weight |
Remove Weight |
Display Result |
|---|---|---|---|---|
|
1 |
Kilogram |
0.050 kg |
|
--.--- |
| Pound | 0.10 lb | --.--- | ||
|
2 |
Kilogram |
|
0.050 kg |
15.000 kg |
| Pound | 0.10 lb | 30.00 lb |
Note: Do not remove any weight from the Top Plate after completing this test.
Decreasing Load Test
This test checks the scaleʹs accuracy when incrementally removing weight from the Top Plate. Use weights that correspond to the 7878 weight feature, as shown in the following table.
Note: This test must immediately follow the Over–Capacity Test; do not remove any of the weights from the previous test prior to running this test.
|
Step |
Weight Feature |
Remove Weight |
Display Result |
|---|---|---|---|
|
1
|
Kilogram |
2.500 kg |
12.500 ± 0.005 kg |
|
Pound |
10.00 lb |
20.00 ± 0.01 lb |
|
|
2
|
Kilogram |
5.000 kg |
7.500 ± 0.005 kg |
|
Pound |
10.00 lb |
10.00 ± 0.01 lb |
|
|
3
|
Kilogram |
5.000 kg |
2.500 ± 0.000 kg |
|
Pound |
5.00 lb |
5.00 ± 0.00 lb |
|
|
4
|
Kilogram |
2.500 kg |
0.000 ± 0.000 kg |
|
Pound |
5.00 lb |
0.00 ± 0.00 lb |
Shift Test
This test involves moving a weight off the center point of the Top Plate to check for continued accuracy.
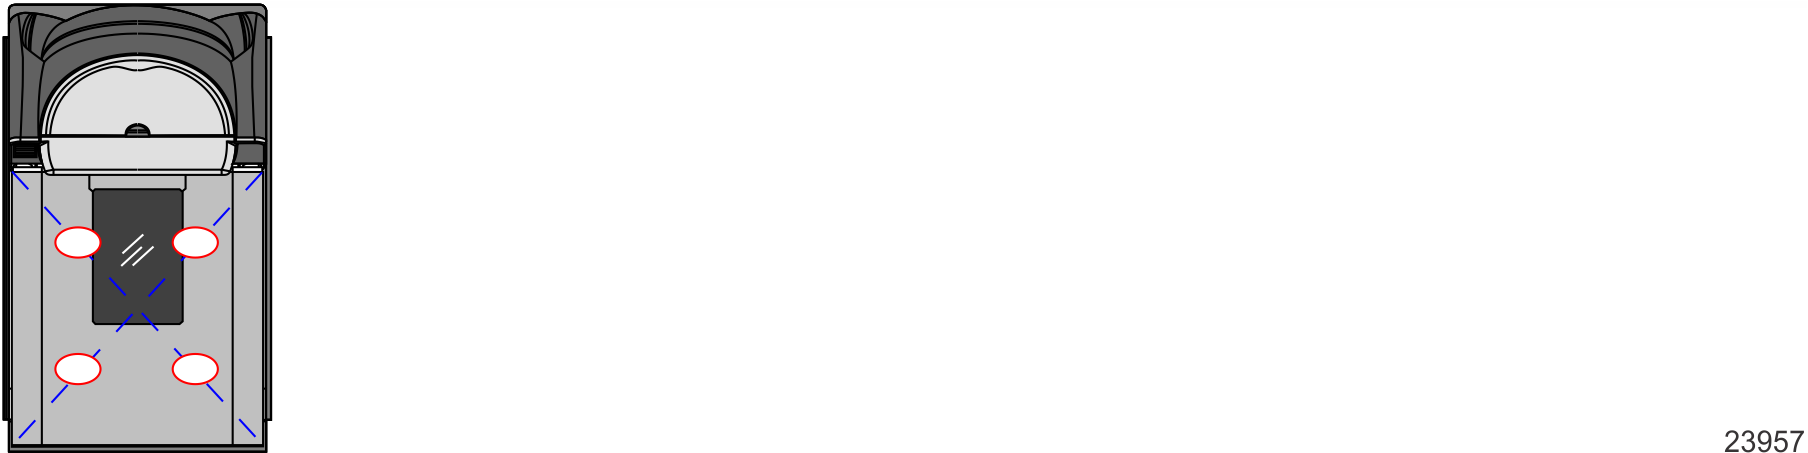
Note: Circles are half way from the center and corners of the Top Plate.
1.Place an appropriate Test Load weight for each weight feature on each of the 4 circles individually. The display must show the same weight between any of the 4 readings.
2.Remove all weights. The display must read 0.000 ± 0.000 kg (0.00 ± 0.01 lb). Test max 15 kg (30 lb) in the center only.
3.Press and hold the Scale Zero Button. Record the Cal and Par values shown on the display.
|
Position |
Weight Feature |
Test Load |
Display Result |
|---|---|---|---|
|
1
|
Kilogram |
5.000 kg |
5.000 kg |
|
Pound |
10.00 lb |
10.00 lb |
|
|
2
|
Kilogram |
5.000 kg |
5.000 kg |
|
Pound |
10.00 lb |
10.00 lb |
|
|
3
|
Kilogram |
5.000 kg |
5.000 kg |
|
Pound |
10.00 lb |
10.00 lb |
|
|
4 |
Kilogram |
5.000 kg |
5.000 kg |
|
Pound |
10.00 lb |
10.00 lb |
|
|
5 |
Kilogram |
5.000 kg |
5.000 kg |
|
Pound |
10.00 lb |
10.00 lb |
Secure the Calibration Switch
After performing a scale calibration and accuracy verification, attach a seal to the scale calibration security cover. Depending on local laws, Weights and Measures officials may be required to attach the seal.
Note: In the United States and Canada, the audit trail can serve as an acceptable security seal when the RealScan 25 (7825) Remote Display is present.
Perform the following procedure to secure the calibration switch:
1.Remove the Top Plate.
2.Lift the plastic Scale Calibration Switch Security Cover located on the front of the unit.
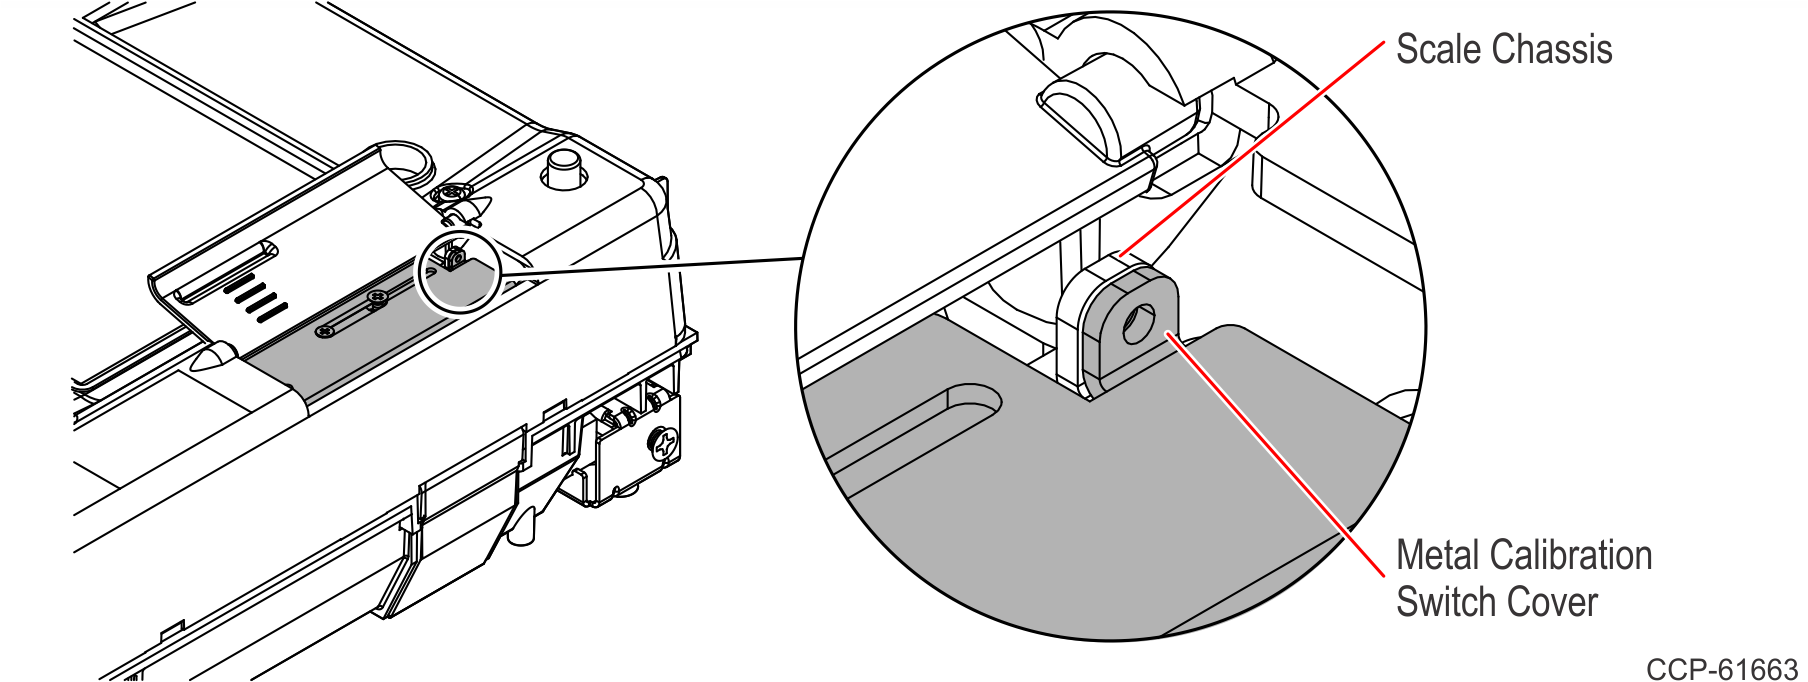
3.Align the seal holes of the metal Calibration Switch Cover and the Scale Chassis, and seal with one of the following:
•Lead/Wire Seal (NCR Part Number: 603–8001097) using a Lead/Wire Seal Press (NCR Part Number: 603–9000157)
•Film/Paper Seal (Obtain locally—Must meet the requirements of the local government)
4.Close the plastic Scale Calibration Switch Security Cover.
5.Reinstall the Top Plate.