Enabling the merchandise menu feature
To enable the merchandise menu feature, ensure the following conditions are met:
- Enable the Merchandise Menu button on the Sale Main Menu screen. For more information, refer to Menu Buttons.
- Set the Active option of the Main Menu record in the Merchandise Menus parameter group to Yes. The Advanced Store solution uses the configuration of this record to display the Merchandise Menu screen on the POS application. For more information, refer to Merchandise Menus. Caution
Do not modify the name or delete the Main Menu record. Modifying the name or deleting the record will disable the merchandise menu feature.
- Create at least one active merchandise menu in the store. For more information, refer to Creating merchandise menus.
- Create POS buttons for store products. For more information, refer to Creating merchandise menu items.
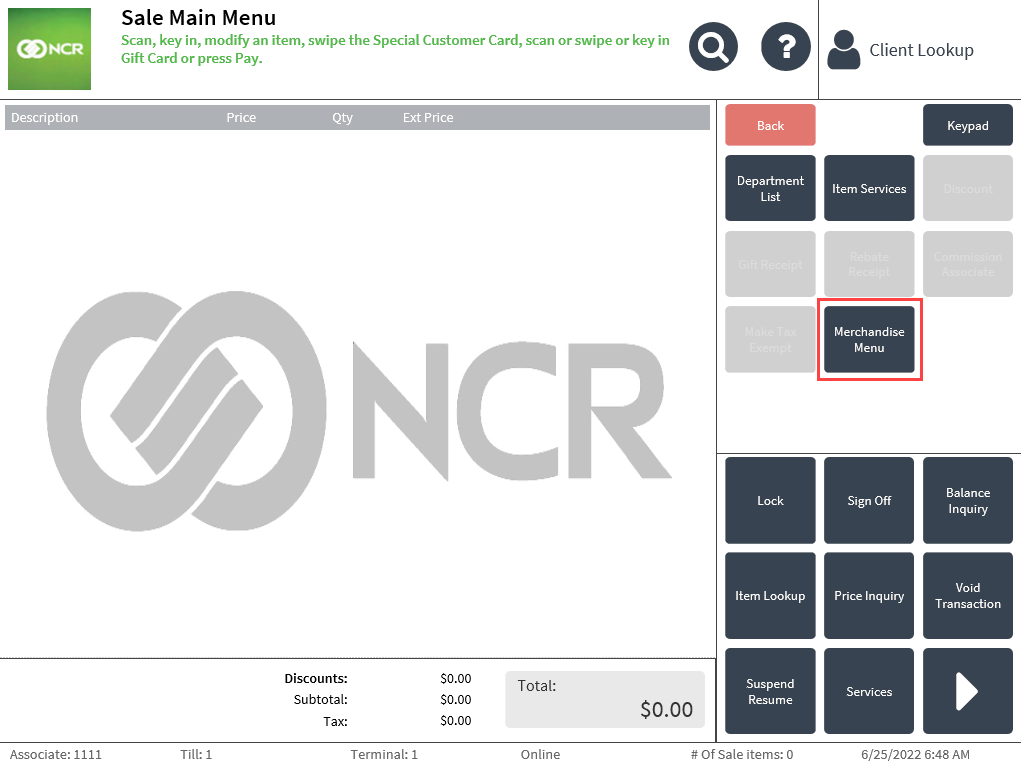
Accessing the merchandise menu feature
After completing the specified conditionsTo access the main merchandise menu on the POS application, go to the Sale Main Menu screen and select Merchandise Menu.
Configurable features
The POS application can be configured with the following merchandise menu feature options:
- Enable the Merchandise Menu button on the Sale Main Menu screen. For more information, refer to Menu Buttons.
- Configure the display settings on the main Merchandise Menu screen with the following options:
- Specify the number of button rows and columns displayed on the Merchandise Menu screen.
- Specify the layout style of the information displayed on the POS button assigned to the main menu.
- For more information, refer to Merchandise Menus.
- Create or modify a merchandise menu with the following options:
- Define the name of the merchandise menu.
- Define the unique ID of the merchandise menu
- Specify the number of button rows and columns displayed on the merchandise menu.
- Determine the information displayed on the buttons in the merchandise menu.
- Activate the merchandise menu.
- For more information, refer to Merchandise Menus.
- Create or modify a POS button for a merchandise menu wih the following options:
- Define the unique ID of the button.
- Assign the button to a merchandise menu.
- Specify the parent menu of the button.
- Define the label or name of the button.
- Define the second line of text that will be displayed on the button, below the label.
- Determine the background color of the button.
- Determine the color of the label text displayed on the button.
- Determine the background color of the button when pressed on The POS application.
- Determine the color of the label text displayed on the button when pressed on the POS application.
- Define the URL path of the image that will be displayed on the button.
- For more information, refer to Merchandise Menu Buttons.
- Create or modify a POS button for a store product with the following options:
- Define the unique ID of the button.
- Define the label or name of the button.
- Define the second line of text that will be displayed on the button, below the label.
- Determine the background color of the button.
- Determine the color of the label text displayed on the button.
- Determine the background color of the button when pressed on The POS application.
- Determine the color of the label text displayed on the button when pressed on the POS application.
- Assign the button as an item for sale.
- Specify the code of the item as defined in the store’s database.
- Define the URL path of the image tat will be displayed on the button.
- For more information, refer to Merchandise Menu Buttons.
- Configure the URL path format of the images used in POS buttons with the following options:
- Specify the prefix of the image URL path.
- Specify the suffix of the image URL path.
- Specify the URL format of the image URL path.
-
Note
When the values for these parameters are defined, the image URL in the Enterprise should not be configured.
- For more information, refer to Item Setup.